6. Using the Zope Management Interface
Attention
This document was written for Zope 2.
6.1. Introduction
When you log in to Zope, you are presented with the Zope Management Interface (ZMI). The ZMI is a management and configuration environment that allows you to control Zope, manipulate Zope objects, and configure web applications.
The Zope Management Interface represents a view into the Zope object hierarchy. Almost every link or button in the ZMI represents an action that is taken against an object. When you build web applications with Zope, you typically spend some of your time creating and managing objects.
Don’t be frightened if you don’t understand the word “object” just yet. For the purposes of this chapter, the definition of an “object” is any discrete item that is manageable through the ZMI. In fact, for the purposes of this chapter, you can safely replace the word “object” with the word “thing” with no ill effects. If you do find something confusing, however, you may want to review the Object Orientation chapter for more detail on objects.
6.2. How the Zope Management Interface Relates to Objects
Unlike web server applications like Apache or Microsoft IIS, Zope does not “serve up” HTML files that it finds on your server’s hard drive. Similarly, the objects that Zope creates are not stored in “.html” files on your server. There is no file hierarchy on your server’s computer that contains all of your Zope objects.
Instead, the objects that Zope creates are stored in a database called the “Zope Object DataBase”, or the ZODB. In default configurations, the ZODB creates a file named “Data.fs” in which Zope stores its objects. The ZMI is the primary way by which you interact with Zope objects stored in this database. Note that there are other methods of interacting with objects stored in the ZODB, including FTP and WebDAV, which are detailed in the chapter in this book entitled Managing Zope Using External Tools, but the ZMI is the primary management tool.
6.3. ZMI Frames
The ZMI uses three browser frames:
The left frame is called the Navigator Frame, which can be used to expand or collapse a view into the Zope object hierarchy, much like you would expand and collapse a view of files using a file tree widget like the one in Windows Explorer.
The right frame is called the Workspace Frame, which displays a particular view of the object you’re currently managing.
The top frame is called the Status Frame, which displays your user name (when logged in), as well as a drop-down list that performs various actions.
6.3.1. The Navigator Frame
In the left-hand, or Navigator, frame, you have a view into the root folder and all of its subfolders. The root folder is in the upper-left corner of the tree. The root folder is the “topmost” container of Zope objects: almost everything meaningful in your Zope instance lives inside the root folder.
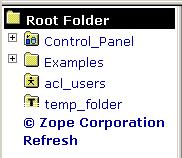
The Navigator Frame
Some of the folders in the Navigator are displayed with “plus mark” icons to their left. These icons let you expand the folders to see the sub-folders inside them.
When you click on an object icon or name in the Navigator, the Workspace frame will refresh with a view of that object.
6.3.2. The Workspace Frame
The right-hand frame of the management interface shows the object you are currently managing. When you first log into Zope, the root folder is displayed as the current object. The workspace gives you information about the current object and lets you manage it.
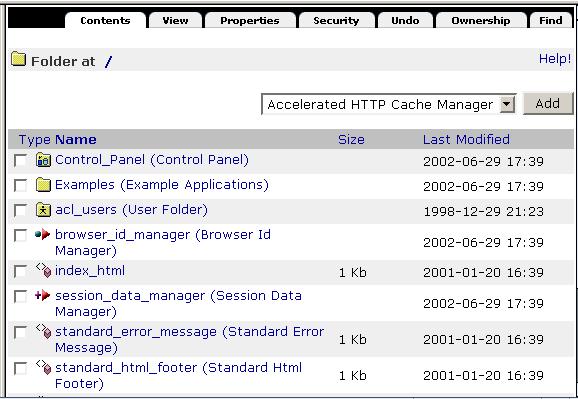
The Workspace Frame
A series of tabs is displayed across the top of the screen. The tab that is currently active is highlighted in a lighter color. Each tab takes you to a different view of the current object, and each view lets you perform a different management function on that object.
When you first log into Zope, you are looking at the Contents view of the root folder object.
At the top of the workspace, just below the tabs, is a description of the current object’s type and URL. On the left is an icon representing the current object’s type, and to the right of that is the object’s URL.
At the top of the page, ‘Folder at /’ tells you that the current object is a folder and that its path is “/”. Note that this path is the object’s place relative to Zope’s “root” folder. The root folder’s path is expressed as “/” , and since you are looking at the root when you first log in, the path displayed at the the top of the workspace is simply “/”.
Zope object paths are typically mirrored in the URLs that are used to access a Zope object. For instance, if the main URL of your Zope site was http://mysite.example.com:8080, then the URL of the root folder would be http://mysite.example.com:8080/ and the URL of ‘Folder at /myFolder’ would be ‘http://mysite.example.com:8080/myFolder’.
As you explore different Zope objects, you’ll find that the links displayed at the top of the workspace frame can be used to navigate between objects’ management views. For example, if you are managing a folder at /Zoo/Reptiles/Snakes, you can return to the folder at /Zoo by clicking on the word Zoo in the folder’s URL.
6.3.3. The Status Frame
The “status frame” at the top of the management interface displays your current login name, along with a pull-down box that lets you select:
Preferences: By selecting this menu item, you can set default preferences for your Zope management interface experience. You can choose to turn off the status frame. You can also choose whether you want the management interface to try to use style sheets. Additionally, you can change the default height and width of text-area boxes displayed in the ZMI. This information is associated with your browser via a cookie. It is not associated in any way with your Zope user account.
Logout: Selecting this menu item will log you out of Zope. Due to the way that the HTTP “basic authentication” protocol works, this may not behave properly with all browsers. If you experience problems logging out using this method, try closing and reopening your browser to log out.

The Status Frame
6.4. Creating Objects
The Zope Management Interface allows you to create new objects in your Zope instance. To add a new object, select an entry from the pull-down menu in the Workspace labeled “Select type to add…”. This pull-down menu is called the add list.
The first kind of object you’ll want to add in order to “try out” Zope is a “Folder”. To create a Zope Folder object, navigate to the root folder and select Folder from the add list. At this point, you’ll be taken to an add form that collects information about the new folder, as shown in the figure below.
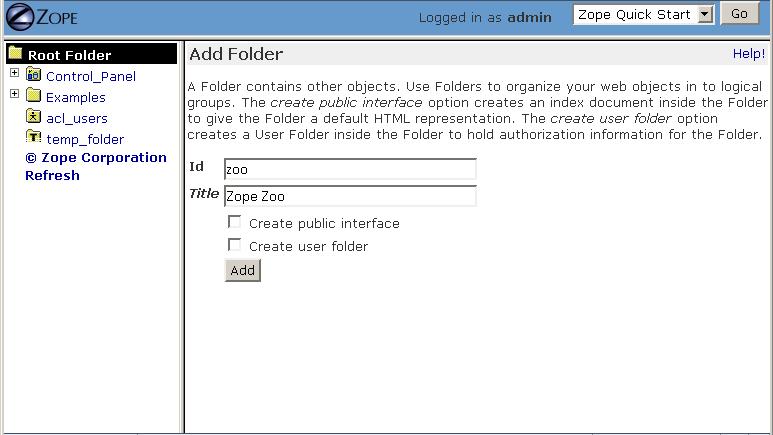
Folder add form
Type “zoo” in the Id field, and “Zope Zoo” in the Title field. Then click the Add button.
Zope will create a new Folder object in the current folder named zoo. You can verify this by noting that there is now a new folder named zoo inside the root folder.
Click on zoo to “enter” it. The Workspace frame will switch to the contents view of zoo (which is currently an “empty” folder, as it has no sub-objects or contents). Note that the URL of the zoo folder is based on the folder’s id.
You can create more folders inside your new folder if you wish. For example, create a folder inside the zoo folder with an id of arctic. Enter the zoo folder and choose Folder from the pull-down menu. Then type in “arctic” for the folder id, and “Arctic Exhibit” for the title. Now click the Add button.
When you use Zope, you create new objects by following these steps:
Enter the folder where you want to add a new object.
Choose the type of object you want to add from the add list.
Fill out the resulting add form and submit it. As a result, Zope will create a new object in the folder.
Notice that every Zope object has an id that you need to specify in the add form when you create the object. The id is how Zope names objects. Objects also use their ids as a part of their URL. The URL of any given Zope object is typically a URL consisting of the folders in which the object lives plus its name. For example, we created a folder named “zoo” in the root folder. If our site were called “mysite.example.com”, the new folder’s URL would be “http://mysite.example.com/zoo”.
6.5. Moving and Renaming Objects
Most computer systems let you move files around in directories with cut, copy, and paste actions. The ZMI uses a similar system that lets you move objects around in folders by cutting or copying them, and then pasting them to a new location.
To experiment with copy and paste, create a new Folder object in the root folder with an id of bears. Then select bears by checking the check box just to the left of the folder. Then click the Cut button. Cut selects the selected objects from the folder and places them on Zope’s “clipboard”. The object will not, however, disappear from its location until it is pasted somewhere else.
Now enter the zoo folder by clicking on it. Click the Paste button to paste the cut object into the zoo folder. You should see the bears folder appear in its new location. You can verify that the folder has been moved by going to the root folder and confirming that bears is no longer visible there.
Copy works similarly to cut, in that, when you paste copied objects, the original objects are not removed. Select the object(s) you want to copy and click the Copy button. Then navigate to another folder and click the Paste button.
You can cut and copy folders that contain other objects and move many objects at one time with a single cut and paste. For example, go to the root folder, and copy the zoo folder. Now paste it into the root folder. You will now have two folders inside the root folder: zoo and copy_of_zoo. If you paste an object into the same folder where you copied it, Zope will change the id of the pasted object. This is a necessary step, as you cannot have two objects with the same id in the same folder.
To rename the copy_of_zoo folder, select the folder by checking the check box to the left of the folder. Then click the Rename button. This will take you to the rename form.
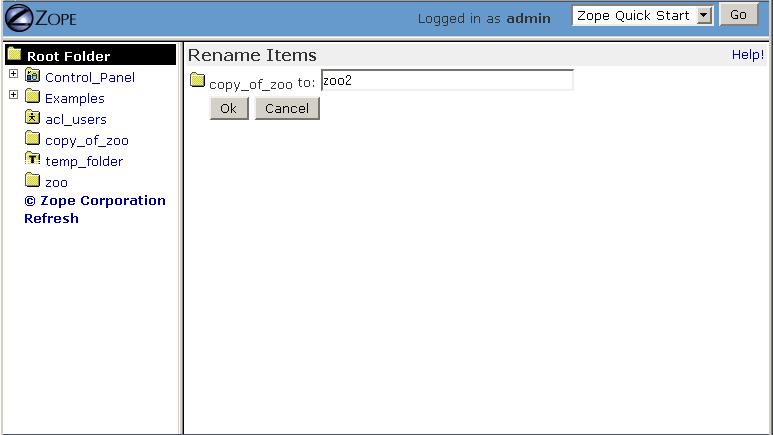
Renaming an Object
Type in the new id value “zoo2” and click OK. Zope ids can consist of letters, numbers, spaces, dashes, underscores, and periods, and they are case-sensitive. Here are some legal Zope ids: index.html, 42, Lucky13, and Snake-Pit.
Now your root folder contains zoo and zoo2 folders. Each of these folders contains a bears folder. This is because when we made a copy of the zoo folder, we also copied the bears folder that it contained. Copying an object also copies all of the objects it contains.
If you want to delete an object, select it and then click the Delete button. Unlike cut objects, deleted objects are not placed on the clipboard and cannot be pasted. In the next section, we’ll see how we can retrieve deleted objects using Undo.
Zope will not let you cut, delete, or rename a few particular objects in the root folder. These objects include Control_Panel, browser_id_manager, and temp_folder. These objects are necessary for Zope’s operation. It is possible to delete other root objects, such as index_html, session_data_manager and standard_error_message, but it is not recommended to do so unless you have a very good reason.
6.6. Transactions and Undoing Mistakes
All objects you create in Zope are stored in Zope’s “object database”. Unlike other web application servers, Zope doesn’t store its objects in files on a filesystem. Instead, all Zope objects are stored by default in a single special file on the filesystem named ‘Data.fs’. This file is stored in the ‘var’ directory of your Zope instance. Using an object database rather than storing objects on the file system allows operations to Zope objects to be transactional.
A transactional operation is one in which all changes to a set of objects are committed as a single “batch”. In Zope, a single web request initiates a transaction. When the web request is finished, Zope commits the transaction unless an error occurs during the processing of the request. If there is an error, Zope refrains from committing the transaction. Each transaction describes all of the changes that happen in the course of performing a web request.
Most actions in Zope that causes a transaction can be undone via the Undo tab. You can recover from mistakes by undoing the transaction that represents the mistake. This includes undo actions themselves, which can also be undone to restore an object to its state before the undo action.
Select the zoo folder that we created earlier and click Delete. The folder disappears. You can get it back by undoing the delete action.
Click the Undo tab, as shown in the figure below.
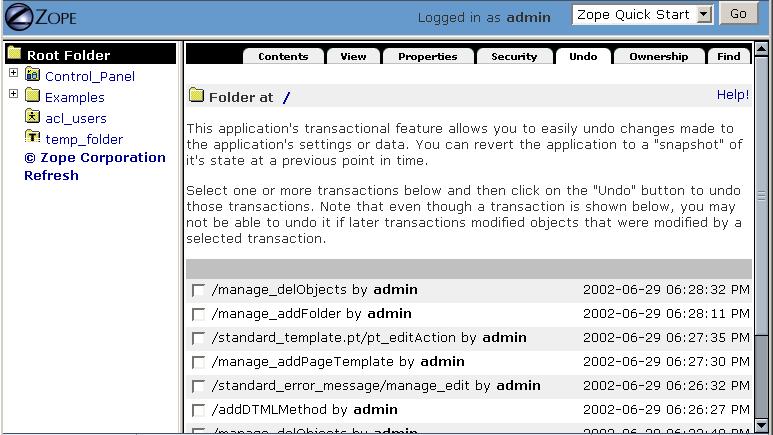
The Undo view
Transactions are named after the Zope action, or “method”, that initiated
them. In this case, the initiating method was one named
/manage_delObjects, which is the name of the Zope action that deletes
Zope objects.
Select the first transaction labeled /manage_delObjects, and click the Undo button at the bottom of the form. Doing so instructs Zope to undo the last transaction. You can verify that the task has been completed by visiting the root folder to confirm that the zoo folder has returned. If you use the “Back” button to revisit the root folder, you may need to refresh your browser to see the proper results. To see the effect in the Navigator pane, click the “Refresh” link within the pane.
You may “undo an undo” action, or “redo” the action, and you can undo and redo actions as many times as you like. When you perform a “redo”, Zope inserts a transaction into the undo log describing the redo action.
The Undo tab is available on most Zope objects. When viewing the Undo tab of a particular object, the list of undoable transactions is filtered down to the transactions that have recently affected the current object and its sub-objects.
6.7. Undo Details and Gotchas
You cannot undo a transaction upon which a later transaction depends. For example, if you paste an object into a folder, and then delete an object in the same folder, pasting the first object cannot be undone, as both transactions affect the contents of a single object: the folder. The solution is to undo both transactions. You can undo more than one transaction at a time by selecting multiple transactions on the Undo tab and then clicking Undo.
Only changes to objects stored in Zope’s object database can be undone. If you have integrated data into a relational database server, such as Oracle or MySQL (as discussed in the chapter entitled “Relational Database Connectivity”), changes to data stored there cannot be undone.
6.8. Reviewing Change History
The Undo tab will provide you with enough information to know that a change has occurred. However, it will not tell you much about the effect of the transaction on the objects that were changed during the transaction.
6.9. Using Object Properties
Properties are ways of associating information with many objects in Zope, including folders. For example, many Zope content objects have a content type property, and others contain metadata about the object, such as its author, title, or status.
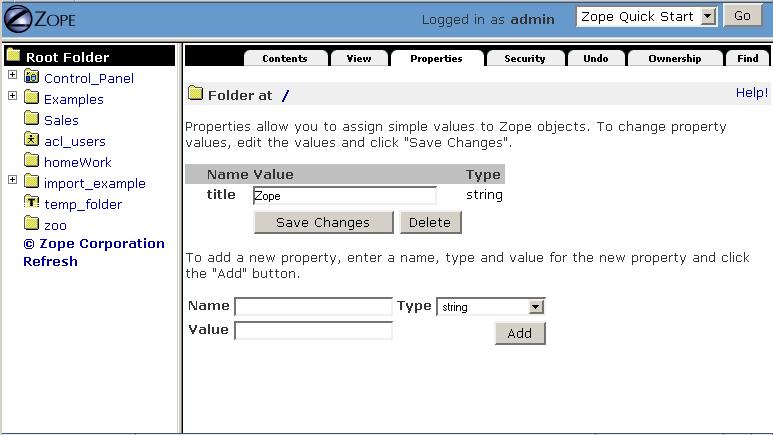
Properties can provide more complex data than strings, such as numbers, lists, and other data structures. All properties are managed via the Properties view. Click on the Properties tab of the “root” object, and you will be taken to the properties management view, as seen in the figure below.
The Properties Management View
A property consists of a name, a value, and a type. A property’s type defines what kind of value or values it can have.
In the figure above, you can see that the folder has a single string property title, which has the value ‘Zope’. You may change any predefined property by changing its value in the Value box, and then clicking Save Changes. You may add additional properties to an object by entering a name, value, and type into the bottom-most field in the Properties view.
Zope supports a number of property types and each type is suited to a specific task. This list gives a brief overview of the kinds of properties you can create from the management interface:
- string
A string is a sequence of characters of arbitrary length. Strings are the most basic and useful type of property in Zope.
- int
An int property is an integer, which can be any positive or negative number that is not a fraction. An int is guaranteed to be at least 32 bits long.
- long
A long is an integer that has no range limitation.
- float
A float holds a floating point, or decimal number. Monetary values, for example, often use floats.
- lines
A lines property is a sequence of strings.
- tokens
A tokens property is a list of words separated by spaces.
- text
A text property is just like a string property, except that Zope normalizes the line ending characters (different browsers use different line ending conventions).
- selection
A selection property is special, in that it is used to render an HTML single selection input widget.
- multiple selection
A multiple selection property is special, in that it is used to render an HTML multiple selection form input widget.
Properties are very useful tools for tagging your Zope objects with bits of metadata. Properties are supported by most Zope objects and are often referenced by your application logic for purposes of data display.
6.10. Logging Out
You may choose Logout from the Status Frame drop-down box to attempt to log out of Zope. Doing so will cause your browser to “pop up” an authentication dialog. Due to the way most web browsers work, you may actually need to click on the “OK” button with an incorrect user name and password in the authentication dialog in order to effectively log out of the ZMI. If you do not do so, you may find even after selecting “Logout” that you are still logged in. This is an intrinsic limitation of the HTTP Basic Authentication protocol, which Zope’s stock user folder employs. Alternately, you may close and reopen your browser to log out of Zope.