12. Users and Security
Attention
This document was written for Zope 2.
12.1. Introduction to Zope Security
Zope is a multi-user system. However, instead of relying upon the user accounts provided by the operating system under which it runs, Zope maintains one or more of its own user databases. It is not necessary to create a user account on the operating system under which Zope runs in order to grant someone a user account which they may use to access your Zope application or manage Zope via its management interface.
It is important to note that Zope users do not have any of the privileges of a “normal” user on your computer’s operating system. For instance, they do not possess the privilege to change arbitrary files on your computer’s filesystem. Typically, a Zope user may influence the content of databases that are connected to Zope may execute scripts (or other “logic” objects) based on Zope’s security-restricted execution environment. It is also possible to allow users to create their own scripts and content “through the web” by giving them access to the Zope Management Interface. However, you can restrict the capability of a user or a class of users to whatever suits your goals. The important concept to absorb is that Zope’s security is entirely divorced from the operating system upon which it runs.
In Zope, users have only the capabilities granted to them by a Zope security policy. As the administrator of a Zope system, you have the power to change your Zope system’s security policies to whatever suits your business requirements.
Furthermore, using security policies you can provide the capability to “safely” delegate capabilities to users defined within different parts of a Zope site. “Safe delegation” is one of the important and differentiating features of Zope. It is possible to grant users the capability in a Zope site to administer users and create scripts and content via the Zope Management Interface. This is called “safe” delegation because it is relatively “safe” to grant users these kinds of capabilities within a particular portion of a Zope site, as it does not compromise operating system security nor Zope security in other portions of the site. Caveats to safe delegation pertain to denial of service and resource exhaustion (it is not possible to control a user’s resource consumption with any true measure of success within Zope), but it is possible to delegate these capabilities to “semi-trusted” users in order to decentralize control of a website, allowing it to grow faster and require less oversight from a central source.
In this chapter we will look more closely at administering users, building roles, mapping roles to permissions, and creating a security policy for your Zope site.
12.2. Review: Logging In and Logging Out of the Zope Management Interface
As we first saw in the chapter entitled Installing Zope , you may log into the Zope Management Interface by visiting a “management” URL in your web browser, entering a username and password when prompted. We also pointed out in Using the Zope Management Interface that due to the way many web browsers work, you often must perform an extra step when an authentication dialog is raised or you must quit your browser to log out of Zope. Review these chapters for more information about the basics of logging in and out of the Zope Management Interface.
12.3. Zope’s “Stock” Security Setup
“Out of the box”, a vanilla Zope site has two different classes of users: Managers and Anonymous users. You have already seen via the Installing Zope chapter how you can log into the Zope management interface with the “initial” user called “admin”. The initial “admin” user is a user with the Manager role, which allows him to perform almost any duty that can be performed within a Zope instance.
By default, in the “stock” Zope setup, Managers have the rights to alter Zope content and logic objects and view the management interface, while the Anonymous users are only permitted to view rendered content. This may be sufficient for many simple websites and applications, especially “public-facing” sites which have no requirement for users to “log in” or compose their own content.
12.4. Identification and Authentication
When a user accesses a protected resource (for example, by attempting to view a “protected” Page Template) Zope will ask the user to log in by presenting an authentication dialog. Once the dialog has been “filled out” and submitted, Zope will look for the user account represented by this set of credentials. By default Zope uses HTTP basic authentication. A cookie-based authentication can be implemented by adding a CookieCrumbler to the site’s base folder.
Zope identifies a user by examining the username and password provided during the entry into the authentication dialog. If Zope finds a user within one of its user databases with the username provided, the user is identified.
Once a user has been identified, authentication may or may not happen. Authentication succeeds if the password provided by the user in the dialog matches the password registered for that user in the database.
Zope will only attempt to identify and authenticate a user if he attempts to perform an action against Zope which an anonymous user has not been permitted the capability to perform; if a user never attempts to access a protected resource, Zope will continue to treat the user as an anonymous user.
Zope prompts a user for authentication if the user attempts to access a “protected” resource without an adequate set of credentials, as determined by the resource’s security policy. For example, if a user attempts to access a method of an object which has a restrictive security policy (like all of Zope’s management interface methods) the user will be prompted for authentication if he is not logged in. You’ve seen this behavior already if you’ve ever attempted to log in to Zope and have been asked for a username and password to access the ZMI. The ZMI is an example of a Zope application. Zope’s security machinery performs security checks on behalf of the ZMI; it “pops up” an authentication dialog requesting that the user enter a username and password.
Different things can happen with respect to being prompted for authentication credentials in response to a request for a protected resource depending on the current state of a login session. If the user has not not yet logged in, Zope will prompt the user for a username and password. If the user is logged in but the account under which he is logged in does not have sufficient privilege to perform the action he has requested, Zope will prompt him for a different username and password. If he is logged in and the account under which he has logged in does have sufficient privileges to perform the requested action, the action will be performed. If a user cannot be authenticated because he provides a nonexistent username or an incorrect password to an existing authentication dialog, Zope re-prompts the user for authentication information as necessary until the user either “gets it right” or gives up.
In general, there is no need for a user to log in to Zope if he only wishes to use public resources. For example, to view the parts of your Zope website that are publically available, a user should not need to log in.
12.6. Managing Users
In the chapter entitled Installing Zope, you were provided with an “initial” account named ‘admin’, which possesses the ‘Manager’ role, allowing you to manage the objects in your Zope instance. To allow other people to log into Zope, and to further understand Zope security, you should create user accounts under which different users may authenticate.
12.6.1. Creating Users in User Folders
A Zope User object defines a user account. A Zope User has a name, a password, one or more roles, and various other properties. Roles are granted to a user in order to make it easier to control the scope of what he or she may do within a Zope site.
To create user accounts in Zope, you create users within User Folders. A user folder contains user objects that define Zope user accounts. User Folder objects always have a Zope “id” of ‘acl_users’. More than one user folder can exist within a Zope instance, but more than one user folder may not exist within the same Zope Folder.
To create a new account, visit the root Zope folder. Click on the object named acl_users. Click the Add button to create a new user.
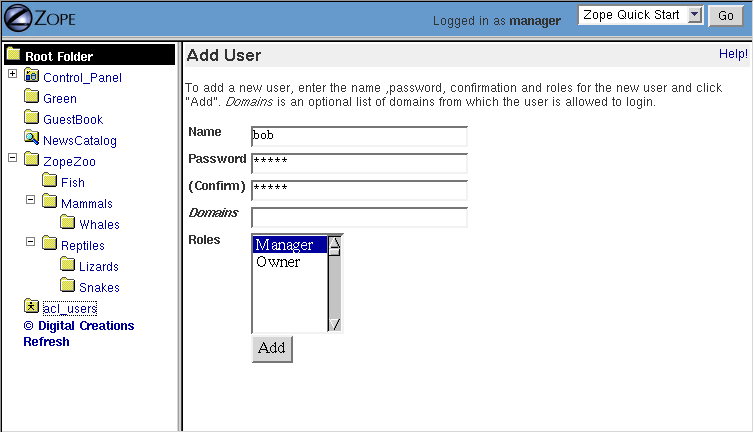
Adding a user to a user folder
The form shown above lets you define the user. Type a username in the Name field (for example, “bob”). The username can contain letters, spaces, and numbers. The username is case sensitive. Choose a password for your new user and enter it in the Password and (Confirm) fields. In the next section, we will provide information about allowing a user to change his or her own password.
The Domains field lets you restrict Internet domains from which the user can log in. This allows you to add another safety control to your account. For example if you always want your a user to log in from work you could enter your work’s Internet domain name, for example “myjob.com”, in the Domains field. You can specify multiple domains separated by spaces to allow the user to log in from multiple domains. For example if you decide that your coworker should be able to manage Zope from their home account too, you could set the domains to “myjob.com myhome.net”. You can also use IP numbers with asterisks to indicate wildcard names instead of domain names to specify domains. For example, “209.67.167.*” will match all IP addresses that start with “209.67.167”.
The Roles multiple select list indicates which roles the user should have. The Zope default roles include Manager and Owner. In general users who need to perform management tasks using the Zope Management Interface should be given the Manager role. The Owner role is not appropriate to grant in most cases because a user normally only has the Owner role in the context of a specific object. Granting the Owner role to a user in the User Folder management interface grants that user ownership of all objects within the folder in which the user folder is placed as well as all subfolders and subobjects of that folder. It is unfortunate that the Owner role is present in the list of roles to choose from in the User Folder management interface, as it is confusing, little-used, and only now exists to service backwards compatibility. In most cases it can be ignored completely.
You may define your own roles such as Editor and Reviewer. In the section later in this chapter named “Defining Roles”, we will create a new set of roles. For now, we will work with the “stock” Zope roles.
To create the new user click the Add button. You should see a new user object in the user folder.
Zope User accounts defined in the “stock” user folder implementation do not support additional properties like email addresses and phone numbers. For support of properties like these, you will have to use external User products like the Pluggable Auth Service
Users can not be copied and pasted between User Folders. The facility does not exist to perform this.
12.6.2. Editing Users
You can edit existing users by clicking on their name within the User Folder management interface screen. Performing this action causes a form to be displayed which is very similar to the form you used to create a user. In fact, you may control most of the same settings that we detailed in the “Adding Users” section from within this form. It is possible to visit this management screen and change a user’s password, his roles, and his domain settings. In the “stock” user folder implementation, you cannot change a user’s name, however, so you will need to delete and recreate a user if you need to change his name.
It is not possible for someone to find out a user’s password by using the management interface. Another manager may have access to change another user’s password, but he may not find out what the current password is from within the management interface. If a user’s password is lost, it is lost forever.
Like all Zope management functions, editing users is protected by the security policy. Users can only change their password if they have the Manage Users permission in the context of their own user folder, which managers have by default. It is often desirable to allow users to change their own passwords. One problem is that by giving a user the Manage Users permission, they are also able to edit other user accounts and add/delete users. This may or may not be what you want.
To grant the capability for users to change their own passwords without being able to influence other users’ information, set up a script with Proxy Roles to do the work for you after reading the section within this chapter entitled “Proxy Roles”.
In general, user folders work like normal Zope folders; you can create, edit and delete contained objects. However, user folders are not as capable as normal folders. You cannot cut and paste users in a user folder, and you can’t create anything besides a user in a user folder.
To delete an existing user from a user folder, select the user and click the Delete button.
12.6.3. Defining a User’s Location
Zope can contain multiple user folders at different locations in the object database hierarchy. A Zope user cannot access protected resources above the user folder in which their account is defined. The location of a user’s account information determines the scope of the user’s access.
If an account is defined in a user folder within the root folder, the user may access protected objects defined within the root folder. This is probably where the account you are using right now is defined. You can however, create user folders within any Zope folder. If a user folder is defined in a subfolder, the user may only access protected resources within that subfolder and within subfolders of that subfolder, and so on.
Consider the case of a user folder at /BeautySchool/Hair/acl_users. Suppose the user Ralph Scissorhands is defined in this user folder. Ralph cannot access protected Zope resources above the folder at /BeautySchool/Hair. Effectively Ralph’s view of protected resources in the Zope site is limited to things in the BeautySchool/Hair folder and below. Regardless of the roles assigned to Ralph, he cannot access protected resources “above” his location. If Ralph was defined as having the ‘Manager’ role, he would be able to go directly to /BeautySchool/Hair/manage to manage his resources, but could not access /BeautySchool/manage at all.
To access the Zope Management Interface as Manager user who is not defined in the “root” user folder, use the URL to the folder which contains his user folder plus ‘manage’. For example, if Ralph Scissorhands above has the Manager role as defined within a user folder in the BeautySchool/Hair folder, he would be able to access the Zope Management Interface by visiting ‘http://zopeserver/BeautySchool/Hair/manage’.
Of course, any user may access any resource which is not protected, so a user’s creation location is not at all relevant with respect to unprotected resources. The user’s location only matters when he attempts to use objects in a way that requires authentication and authorization, such as the objects which compose the Zope Management Interface.
It is straightforward to delegate responsibilities to site managers using this technique. One of the most common Zope management patterns is to place related objects in a folder together and then create a user folder in that folder to define people who are responsible for those objects. By doing so, you “safely” delegate the responsibility for these objects to these users.
For example, suppose people in your organization wear uniforms. You are creating an intranet that provides information about your organization, including information about uniforms. You might create a ‘uniforms’ folder somewhere in the intranet Zope site. In that folder you could put objects such as pictures of uniforms and descriptions for how to wear and clean them. Then you could create a user folder in the ‘uniforms’ folder and create an account for the head tailor. When a new style of uniform comes out the tailor doesn’t have to ask the web master to update the site, he or she can update their own section of the site without bothering anyone else. Additionally, the head tailor cannot log into any folder above the ‘uniforms’ folder, which means the head tailor cannot manage any objects other than those in the ‘uniforms’ folder.
Delegation is a very common pattern in Zope applications. By delegating different areas of your Zope site to different users, you can take the burden of site administration off of a small group of managers and spread that burden around to different specific groups of users.
12.6.4. Working with Alternative User Folders
It may be that you don’t want to manage your user account through the web using Zope’s “stock” user folder implementation. Perhaps you already have a user database, or perhaps you want to use other tools to maintain your account information. Zope allows you to use alternate sources of data as user information repositories. The most popular user folder implementation is called PluggableAuthService which allows you to mix-in and combine a vast number of different authentication schemes and backends, like LDAP or MySQL.
Some user folders provide alternate login and logout controls in the form of web pages, rather than relying on Basic HTTP Authentication controls. Despite this variety, all user folders use the same general log in procedure of prompting you for credentials when you access a protected resource.
While most users are managed with user folders of one kind or another, Zope has a few special user accounts that are not managed with user folder.
12.6.5. Special User Accounts
Zope provides three special user accounts which are not defined with user folders, the anonymous user, the emergency user, and the initial manager. The anonymous user is used frequently, while the emergency user and initial manager accounts are rarely used but are important to know about.
12.6.5.1. Zope Anonymous User
Zope has a built-in user account for “guests” who possess no credentials. This is the ‘Anonymous’ user. If you don’t have a user account on Zope, you’ll be considered to be the ‘Anonymous’ user.
The ‘Anonymous’ user additionally possesses the ‘Anonymous’ role. The “stock” Zope security policy restricts users which possess the ‘Anonymous’ role from accessing nonpublic resources. You can tailor this policy, but most of the time you’ll find the default anonymous security settings adequate.
As we mentioned earlier in the chapter, you must try to access a protected resource in order for Zope to attempt authentication. Even if you’ve got a user account on the system, Zope will consider you the ‘Anonymous’ user until you been prompted for login and you’ve successfully logged in.
12.6.5.2. Zope Emergency User
Zope has a special user account for emergency use known as the emergency user. The emergency user is not restricted by normal security settings. However, the emergency user cannot create any new objects with the exception of new user objects.
The emergency user is typically only useful for two things: fixing broken permissions, and creating and changing user accounts.
You may use the emergency user account to create or change other user accounts. Typically, you use the emergency user account to define accounts with the ‘Manager’ role or change the password of an existing account which already possesses the ‘Manager’ role. This is useful in case you lose your management user password or username. Typically, after you create or change an existing a manager account you will log out as the emergency user and log back in as the manager.
Another reason to use the emergency user account is to “fix” broken permissions. If you lock yourself out of Zope by removing permissions you need to manage Zope, you can use the emergency user account to repair the permissions. In this case log in as the emergency user and make sure that your manager account has the ‘View management screens’ and ‘Change permissions’ permissions with respect to the object you’re attempting to view. Then log out and log back with your manager account and you should have enough access to fix anything else that is broken.
The emergency user cannot create new “content”, “logic” or “presentation” objects. A common error message seen by users attempting to use the emergency user account in trying to create a new object is shown below.
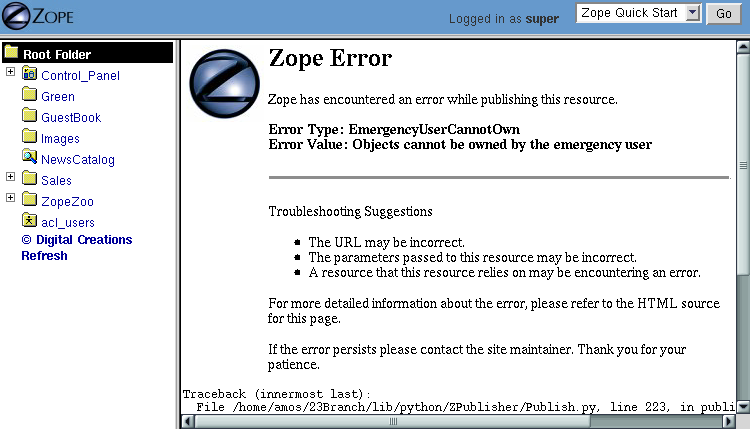
Error caused by trying to create a new object when logged in as the emergency user
The error above lets you know that the emergency user cannot create new objects. This is “by design”, and the reasoning behind this policy may become clearer later in the chapter when we cover ownership.
12.6.5.3. Creating an Emergency User
Unlike normal user accounts that are defined through the Zope Management Interface, the emergency user account is defined through a file in the filesystem. You can change the emergency user account by editing or generating the file named ‘access’ in the Zope home directory (the main Zope directory). Zope comes with a command line utility in the Zope home directory named ‘zpasswd.py’ to manage the emergency user account. On UNIX, run ‘zpasswd.py’ by passing it the ‘access’ file path as its only argument:
$ cd (... where your ZOPE_HOME is... )
$ python zpasswd.py access

Username: superuser
Password:
Verify password:

Please choose a format from:

SHA - SHA-1 hashed password
CRYPT - UNIX-style crypt password
CLEARTEXT - no protection.

Encoding: SHA
Domain restrictions:
Due to pathing differences, Windows users usually need to enter this into a command prompt to invoke zpasswd:
> cd (... where your ZOPE_HOME is ...)
> cd bin
> python ..\zpasswd.py ..\access
The ‘zpasswd.py’ script steps you through the process of creating an emergency user account. Note that when you type in your password it is not echoed to the screen. You can also run ‘zpasswd.py’ with no arguments to get a list of command line options. When setting up or changing the emergency user’s details, you need to restart the Zope process for your changes to come into effect.
12.6.5.4. Zope Initial Manager
The initial manager account is created by the Zope installer so you can log into Zope the first time. When you first install Zope you should see a message like this:
creating default inituser file
Note:
        The initial user name and password are 'admin'
        and 'IVX3kAwU'.

        You can change the name and password through the web
        interface or using the 'zpasswd.py' script.
This lets you know the initial manager’s name and password. You can use this information to log in to Zope for the first time as a manager.
Initial users are defined in a similar way to the emergency user; they are defined in a file on the filesystem named ‘inituser’. On UNIX, the ‘zpasswd.py’ program can be used to edit or generate this file the same way it is used to edit or generate the emergency user ‘access’ file:
$ cd ( ... were your ZOPE_HOME is ... )
$ python zpasswd.py inituser

Username: bob
Password:
Verify password:

Please choose a format from:

SHA - SHA-1 hashed password
CRYPT - UNIX-style crypt password
CLEARTEXT - no protection.

Encoding: SHA
Domain restrictions:
This will create an ‘inituser’ file which contains a user named “bob” and will set its password. The password is not echoed back to you when you type it in. The effect of creating an ‘inituser’ file depends on the state of the existing Zope database.
When Zope starts up, if there are no users in the root user folder (such as when you start Zope with a “fresh” ZODB database), and an ‘inituser’ file exists, the user defined within ‘inituser’ will be created within the root user folder. If any users already exist within the root user folder, the existence of the ‘inituser’ file has no effect. Normally, initial users are created by the Zope installer for you, and you shouldn’t have to worry about changing them. Only in cases where you start a new Zope database (for example, if you delete the ‘var/Data.fs’ file) should you need to worry about creating an ‘inituser’ file. Note that if Zope is being used in an INSTANCE_HOME setup, the created “inituser” file must be copied to the INSTANCE_HOME directory. Most Zope setups are not INSTANCE_HOME setups (unless you’ve explicitly made it so), so you typically don’t need to worry about this. The ‘inituser’ feature is a convenience and is rarely used in practice except by the installer.
12.7. Protecting Against Password Snooping
The HTTP Basic Authentication protocol that Zope uses as part of its “stock” user folder implementation passes login information “over the wire” in an easily decryptable way. It is employed, however, because it has the widest browser support of any available authentication mechanism.
If you’re worried about someone “snooping” your username/password combinations, or you wish to manage your Zope site ultra-securely, you should manage your Zope site via an SSL (Secured Sockets Layer) connection. The easiest way to do this is to use Apache or another webserver which comes with SSL support and put it “in front” of Zope. The chapter of this book entitled Virtual Hosting provides some background that may be helpful to set up an SSL server in front of Zope.
12.8. Managing Custom Security Policies
Zope security policies control authorization; they define who can do what and where they can do it. Security policies describe how roles are associated with permissions in the context of a particular object. Roles label classes of users, and permissions protect objects. Thus, security policies define which classes of users (roles) can take what kinds of actions (permissions) in a given part of the site.
Rather than stating which specific user can take which specific action on which specific object, Zope allows you to define which kinds of users can take which kinds of action in which areas of the site. This sort of generalization makes your security policies simple and more powerful. Of course, you can make exceptions to your policy for specific users, actions, and objects.
12.8.1. Working with Roles
Zope users have roles that define what kinds of actions they can take. Roles define classes of users such as Manager, Anonymous, and Authenticated.
Roles are similar to UNIX groups in that they abstract groups of users. And like UNIX groups, each Zope user can have one or more roles.
Roles make it easier for administrators to manage security. Instead of forcing an administrator to specifically define the actions allowed by each user in a context, the administrator can define different security policies for different user roles in a context. Since roles are classes of users, he needn’t associate the policy directly with a user. Instead, he may associate the policy with one of the user’s roles.
Zope comes with four built-in roles:
- Manager
This role is used for users who perform standard Zope management functions such as creating and edit Zope folders and documents.
- Anonymous
The Zope ‘Anonymous’ user has this role. This role should be authorized to view public resources. In general this role should not be allowed to change Zope objects.
- Owner
This role is assigned automatically to users in the context of objects they create. We’ll cover ownership later in this chapter.
- Authenticated
This role is assigned automatically to users whom have provided valid authentication credentials. This role means that Zope “knows” who a particular user is. When Users are logged in they are considered to also have the Authenticated role, regardless of other roles.
For basic Zope sites you can typically “get by” with only having ‘Manager’ and ‘Anonymous’ roles. For more complex sites you may want to create your own roles to classify your users into different categories.
12.8.2. Defining Global Roles
A “global” role is one that shows up in the “roles” column of the ‘Security’ tab of your Zope objects. To create a new “global” role go to the Security tab of your root Zope object (or any other ‘folderish’ Zope object) and scroll down to the bottom of the screen. Type the name of the new role in the User defined role field, and click Add Role. Role names should be short one or two word descriptions of a type of user such as “Author”, “Site Architect”, or “Designer”. You should pick role names that are relevant to your application.
You can verify that your role was created, noticing that there is now a role column for your new role at the top of the screen. You can delete a role by selecting the role from the select list at the bottom of the security screen and clicking the Delete Role button. You can only delete your own custom roles, you cannot delete any of the “stock” roles that come with Zope.
You should notice that roles can be used at the level at which they are defined and “below” in the object hierarchy. For example, if you create a role in a ‘myfolder’ folder that exists in the Zope root folder, that role cannot be used outside of the ‘myfolder’ folder and any of its subfolders and subobjects. If you want to create a role that is appropriate for your entire site, create it in the root folder.
In general, roles should be applicable for large sections of your site. If you find yourself creating roles to limit access to parts of your site, chances are there are better ways to accomplish the same thing. For example you could simply change the security settings for existing roles on the folder you want to protect, or you could define users deeper in the object hierarchy to limit their access.
12.8.3. Understanding Local Roles
Local roles are an advanced feature of Zope security. Specific users can be granted extra roles when working within the context of a certain object by using a local role. If an object has local roles associated with a user then that user gets those additional roles while working with that object, without needing to reauthenticate.
For example, if a user creates an object using the Zope Management Interface, they are always given the additional local role of Owner in the context of that object. A user might not have the ability to edit Page Templates in general if he does not possess a set of global roles which allow him to do so, but for Page Templates he owns, the user may edit the Page Template by virtue of possessing the Owner local role.
Local roles are a fairly advanced security control. Zope’s automatic control of the Owner local role is likely the only place you’ll encounter local roles unless you create an application which makes use of them. The main reason you might want to manually control local roles is to give a specific user special access to an object. In general you should avoid setting security for specific users if possible. It is easier to manage security settings that control groups of users instead of individuals.
12.8.4. Understanding Permissions
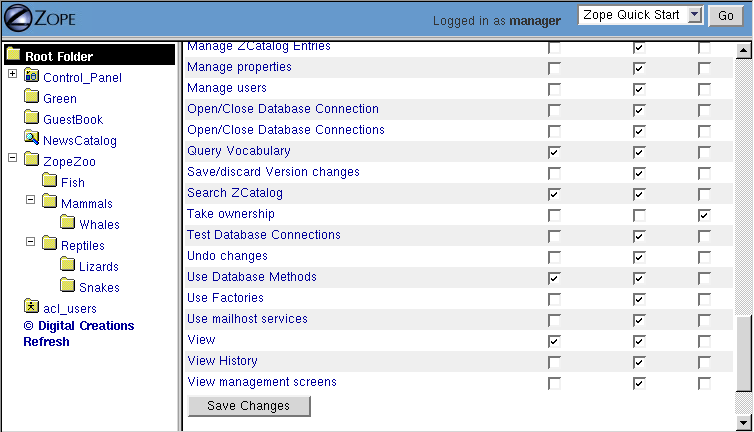
A permission defines a single action which can be taken upon a Zope object. Just as roles abstract users, permissions abstract objects. For example, many Zope objects, including Page Templates and Folders, can be viewed. This action is protected by the View permission. Permissions are defined by Zope developers in Python packages and the Zope “core” itself. Packages are responsible for creating a set of permissions which are relevant to the types of objects they expose.
Some permissions are only relevant for one type of object. Other permissions protect many types of objects, such as the FTP access and WebDAV access permissions which control whether objects are available via FTP and WebDAV.
You can find out what permissions are available on a given object by going to the Security management tab.
The default Zope permissions are described in appendix A of the Zope Developer’s Guide.
Security settings for a mail host object
As you can see in the figure above, a mail host has a limited palette of permissions available. Contrast this to the many permissions that you see when setting security on a folder.
12.8.5. Defining Security Policies
Security policies are where roles meet permissions. Security policies define “who” can do “what” in a given part of the site.
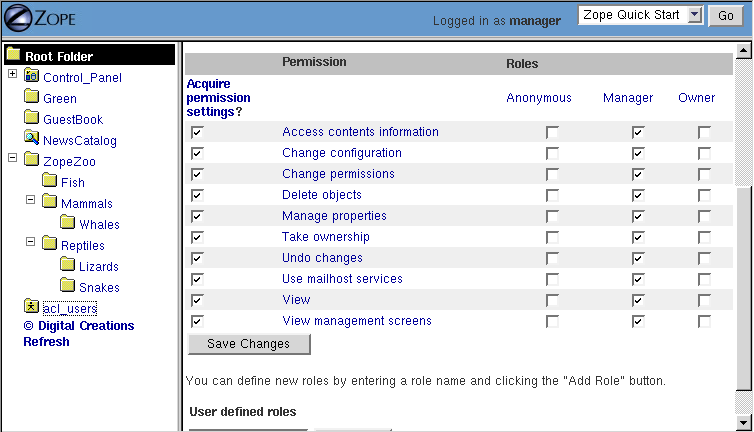
You can set a security policy on almost any Zope object. To set a security policy on an object, go the object’s Security tab. For example, click on the security tab of the root folder.
Security policy for the root folder
In the figure above, the center of the screen displays a grid of check boxes. The vertical columns of the grid represent roles, and the horizontal rows of the grid represent permissions. Checking the box at the intersection of a permission and a role grants users with that role the ability to take actions protected by that permission in the context of the object being managed. In this case, the context is the root folder.
Many Zope Products add custom security permissions to your site when you install them. This can make the permissions list grow quite large, and unwieldy. Product authors should take care to re-use suitable existing permissions if possible, but many times it’s not possible, so the permission list grows with each new Product that is installed.
You’ll notice by virtue of visiting the Security tab of the root folder that Zope comes with a default security policy that allows users which possess the ‘Manager’ role to perform most tasks, and that allows anonymous users to perform only a few restricted tasks. The simplest (and most effective) way to tailor this policy to suit your needs is to change the security settings in the root folder.
For example, you can make your site almost completely “private” by disallowing anonymous users the ability to view objects. To do this deny all anonymous users View access by unchecking the View Permission where it intersects the Anonymous role. You can make your entire site private by making this security policy change in the root folder. If you want to make one part of your site private, you could make this change in the folder you want to make private.
This example points out a very important point about security policies: they control security for a given part of the site only. The only global security policy is the one on the root folder.
12.8.6. Security Policy Acquisition
How do different security policies interact? We’ve seen that you can create security policies on different objects, but what determines which policies control which objects? The answer is that objects use their own policy if they have one, additionally they acquire their parents’ security policies through a process called acquisition. We explored acquisition in the Acquisition chapter. Zope security makes extensive use of acquisition.
Acquisition is a mechanism in Zope for sharing information among objects contained in a folder and its subfolders. The Zope security system uses acquisition to share security policies so that access can be controlled from high-level folders.
You can control security policy acquisition from the Security tab. Notice that there is a column of check boxes to the left of the screen labeled Acquire permission settings. Every check box in this column is checked by default. This means that security policy will acquire its parent’s setting for each permission to role setting in addition to any settings specified on this screen. Keep in mind that for the root folder (which has no parent to acquire from) this left most check box column does not exist.
Suppose you want to make a folder private. As we saw before this merely requires denying the Anonymous role the View permission in the context of this object. But even though the “View” permission’s box may be unchecked the folder might not be private. Why is this? The answer is that the Acquire permission settings option is checked for the View permission. This means that the current settings are augmented by the security policies of this folder’s parents. Somewhere above this folder the Anonymous role must be assigned to the View permission. You can verify this by examining the security policies of this folder’s parents. To make the folder private we must uncheck the Acquire permission settings option. This will ensure that only the settings explicitly in this security policy are in effect.
Each checked checkbox gives a role permission to do an action or a set of actions. With ‘Acquire permission settings’ checked, these permissions are added to the actions allowed in the parent folder. If ‘Acquire permission settings’ is unchecked on the other hand, checkboxes must be explicitly set, and the security setting of the parent folder will have no influence.
In general, you should always acquire security settings unless you have a specific reason to not do so. This will make managing your security settings much easier as much of the work can be done from the root folder.
12.9. Security Usage Patterns
The basic concepts of Zope security are simple: roles and permissions are mapped to one another to create security policies. Users are granted roles (either global roles or local roles). User actions are restricted by the roles they possess in the context of an object. These simple tools can be put together in many different ways. This can make managing security complex. Let’s look at some basic patterns for managing security that provide good examples of how to create an effective and easy to manage security architecture.
12.9.1. Security Rules of Thumb
Here are a few simple guidelines for Zope security management. The security patterns that follow offer more specific recipes, but these guidelines give you some guidance when you face uncharted territory.
Define users at their highest level of control, but no higher.
Group objects that should be managed by the same people together in folders.
Keep it simple.
Rules one and two are closely related. Both are part of a more general rule for Zope site architecture. In general you should refactor your site to locate related resources and users near each other. Granted, it’s almost never possible to force resources and users into a strict hierarchy. However, a well considered arrangement of resources and users into folders and sub-folders helps tremendously.
Regardless of your site architecture, try to keep things simple. The more you complicate your security settings the harder time you’ll have understanding it, managing it and making sure that it’s effective. For example, limit the number of new roles you create, and try to use security policy acquisition to limit the number of places you have to explicitly define security settings. If you find that your security policies, users, and roles are growing into a complex thicket, you should rethink what you’re doing; there’s probably a simpler way.
12.9.2. Global and Local Policies
The most basic Zope security pattern is to define a global security policy on the root folder and acquire this policy everywhere. Then as needed you can add additional policies deeper in the object hierarchy to augment the global policy. Try to limit the number of places that you override the global policy. If you find that you have to make changes in a number of places, consider consolidating the objects in those separate locations into the same folder so that you can make the security settings in one place.
You should choose to acquire permission settings in your sub-policies unless your sub-policy is more restrictive than the global policy. In this case you should uncheck this option for the permission that you want to restrict.
This simple pattern will take care of much of your security needs. Its advantages are that it is easy to manage and easy to understand. These are extremely important characteristics for any security architecture.
12.9.3. Delegating Control to Local Managers
The pattern of delegation is very central to Zope. Zope encourages you to collect like resources in folders together and then to create user accounts in these folders to manage their contents.
Lets say you want to delegate the management of the Sales folder in your Zope site over to the new sales web manager, Steve. First, you don’t want Steve changing any objects which live outside the Sales folder, so you don’t need to add him to the acl_users folder in the root folder. Instead, you would create a new user folder in the Sales folder.
Now you can add Steve to the user folder in Sales and give him the Role Manager. Steve can now log directly into the Sales folder to manage his area of control by pointing his browser to http://www.zopezoo.org/Sales/manage.
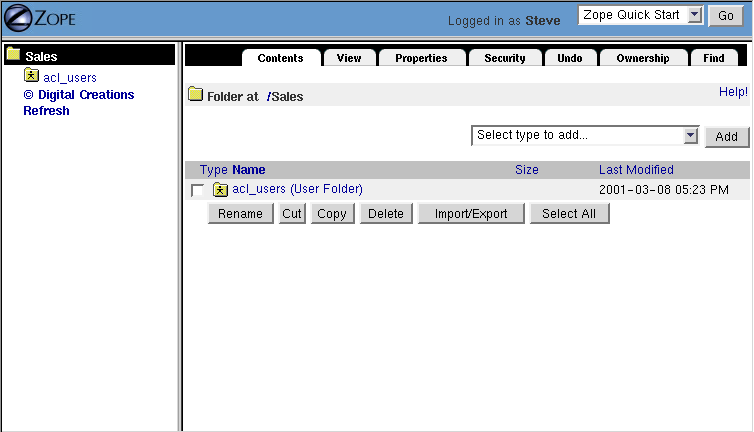
Managing the Sales folder
Notice in the figure above that the navigation tree on the left shows that Sales is the root folder. The local manager defined in this folder will never have the ability to log into any folders above Sales, so it is shown as the top folder.
This pattern is very powerful since it can be applied recursively. For example, Steve can create a sub-folder for multi-level marketing sales. Then he can create a user folder in the multi-level marketing sales folder to delegate control of this folder to the multi-level marketing sales manager. And so on. This allows you to create websites managed by thousands of people without centralized control. Higher level managers need not concern themselves too much with what their underlings do. If they choose they can pay close attention, but they can safely ignore the details since they know that their delegates cannot make any changes outside their area of control, and they know that their security settings will be acquired.
12.10. Different Levels of Access with Roles
The local manager pattern is powerful and scalable, but it takes a rather coarse view of security. Either you have access or you don’t. Sometimes you need to have more fine grained control. Many times you will have resources that need to be used by more than one type of person. Roles provides you with a solution to this problem. Roles allow you to define classes of users and set security policies for them.
Before creating new roles make sure that you really need them. Suppose that you have a website that publishes articles. The public reads articles and managers edit and publish articles, but there is a third class of user who can author articles, but not publish or edit them.
One solution would be to create an authors folder where author accounts are created and given the Manager role. This folder would be private so it could only be viewed by managers. Articles could be written in this folder and then managers could move the articles out of this folder to publish them. This is a reasonable solution, but it requires that authors work only in one part of the site and it requires extra work by managers to move articles out of the authors folder. Also, consider that problems that result when an author wants to update an article that has been moved out of the authors folder.
A better solution is to add an Author role. Adding a role helps us because it allows access controls not based on location. So in our example, by adding an author role we make it possible for articles to be written, edited, and published anywhere in the site. We can set a global security policy that gives authors the ability to create and write articles, but doesn’t grant them permissions to publish or edit articles.
Roles allow you to control access based on who a user is, not just where they are defined.
12.10.1. Controlling Access to Locations with Roles
Roles can help you overcome a problem with the local manager pattern. The problem is that the local manager pattern requires a strict hierarchy of control. There is no provision to allow two different groups of people to access the same resources without one group being the manager of the other group. Put another way, there is no way for users defined in one part of the site to manage resources in another part of the site.
Let’s take an example to illustrate the second limitation of the local manager pattern. Suppose you run a large site for a pharmaceutical company. You have two classes of users, scientists and salespeople. In general the scientists and the salespeople manage different web resources. However, suppose that there are some things that both types of people need to manage, such as advertisements that have to contain complex scientific warnings. If we define our scientists in the Science folder and the salespeople in the Sales folder, where should we put the AdsWithComplexWarnings folder? Unless the Science folder is inside the Sales folder or vice versa there is no place that we can put the AdsWithComplexWarnings folder so that both scientists and salespeople can manage it. It is not a good political or practical solution to have the salespeople manage the scientists or vice versa; what can be done?
The solution is to use roles. You should create two roles at a level above both the Science and Sales folders, say Scientist, and SalesPerson. Then instead of defining the scientists and salespeople in their own folders define them higher in the object hierarchy so that they have access to the AdsWithComplexWarnings folder.
When you create users at this higher level, you should not give them the Manager role, but instead give them Scientist or SalesPerson as appropriate. Then you should set the security policies using the checkboxes in the Security panel. On the Science folder the Scientist role should have the equivalent of Manager control. On the Sales folder, the Salesperson role should have the same permissions as Manager. Finally on the AdsWithComplexWarnings folder you should give both Scientist and Salesperson roles adequate permissions. This way roles are used not to provide different levels of access, but to provide access to different locations based on who you are.
Another common situation when you might want to employ this pattern is when you cannot define your managers locally. For example, you may be using an alternate user folder that requires all users to be defined in the root folder. In this case you would want to make extensive use of roles to limit access to different locations based on roles.
This wraps up our discussion of security patterns. By now you should have a reasonable grasp of how to use user folders, roles, and security policies, to shape a reasonable security architecture for your application. Next we’ll cover two advanced security issues, how to perform security checks, and securing executable content.
12.11. Performing Security Checks
Most of the time when developing a Zope application, you needn’t perform any “manual” security checks. The term for this type of security which does not require manual effort on the part of the application developer is “declarative”. Zope security is typically declarative. If a user attempts to perform a secured operation, Zope will prompt them to log in. If the user doesn’t have adequate permissions to access a protected resource, Zope will deny them access.
However, sometimes you may wish to manually perform security checks. The main reason to do this is to limit the choices you offer a user to those for which they are authorized. This doesn’t prevent a sneaky user from trying to access secured actions, but it does reduce user frustration, by not giving to user the option to try something that will not work.
The most common security query asks whether the current user has a given permission. We use Zope’s ‘checkPermission’ API to do this. For example, suppose your application allows some users to upload files. This action may be protected by the “Add Documents, Images, and Files” standard Zope permission. You can test to see if the current user has this permission in a Page Template:
<form action="upload"
  tal:condition="python:
    modules['AccessControl'].getSecurityManager().checkPermission(
       'Add / Documents, Images, and Files', context)">
...
</form>
A Python Script can be employed to perform the same task on behalf of a Page Template. In the below example, we move the security check out of the Page Template and into a Python Script named ‘check_security’, which we call from the Page Template. Here is the Page template:
<form action="upload"
      tal:condition="python: context.check_security(
         'Add Documents, Images and Files', here)">
Here is the ‘check_security’ Python Script which is referenced within the Page Template:
## Script (Python) "check_security"
##bind container=container
##bind context=context
##bind namespace=
##bind script=script
##bind subpath=traverse_subpath
##parameters=permission, object
##title=Checks security on behalf of a caller

from AccessControl import getSecurityManager
sec_mgr = getSecurityManager()
return sec_mgr.checkPermission(permission, object)
You can see that permission checking may take place manually in any of Zope’s logic objects. Other functions exist in the Zope API for manually performing security checks, but ‘checkPermission’ is arguably the most useful.
By passing the current object to ‘checkPermission’, we make sure that local roles are taken into account when testing whether the current user has a given permission.
You can find out about the current user by accessing the user object. The current user is a Zope object like any other and you can perform actions on it using methods defined in the API documentation.
Suppose you wish to display the current user name on a web page to personalize the page. You can do this easily in Page Template:
<p tal:content="user/getUserName">username</p>
The Zope security API for Scripts is explained in Appendix B: API Reference. The Zope security API for Page Templates is explained in Appendix C: Zope Page Templates Reference.
12.12. Advanced Security Issues: Ownership and Executable Content
You’ve now covered all the basics of Zope security. What remains are the advanced concepts of ownership and executable content. Zope uses ownership to associate objects with users who create them, and executable content refers to objects such as Scripts, which execute user code.
For small sites with trusted users you can safely ignore these advanced issues. However for large sites where you allow untrusted users to create and manage Zope objects, it’s important to understand ownership and securing executable content.
12.12.1. The Problem: Trojan Horse Attacks
The basic scenario that motivates both ownership and executable content controls is a Trojan horse attack. A Trojan horse is an attack on a system that operates by tricking a user into taking a potentially harmful action. A typical Trojan horse masquerades as a benign program that causes harm when you unwittingly run it.
All computer systems are vulnerable to this style of attack. For web-based platforms, all that is required is to trick an authorized, but unsuspecting user to visit a URL that performs a harmful action that the attacker himself is not authorized to perform.
This kind of attack is very hard to protect against. You can trick someone into clicking a link fairly easily, or you can use more advanced techniques such as Javascript to cause a user to visit a malicious URL.
Zope offers some protection from this kind of Trojan horse. Zope helps protect your site from server-side Trojan attacks by limiting the power of web resources based on who authored them. If an untrusted user authors a web page, then the power of the web pages to do harm to unsuspecting visitors will be limited. For example, suppose an untrusted user creates a Script (Python) that deletes all the pages in your site. If anyone attempt to view the page, it will fail since the owner of the object does not have adequate permissions. If a manager views the page, it will also fail, even though the manager does have adequate permissions to perform the dangerous action.
Zope uses ownership information and executable content controls to provide this limited protection.
12.12.2. Managing Ownership
When a user creates a Zope object, the user owns that object. An object that has no owner is referred to as unowned. Ownership information is stored in the object itself. This is similar to how UNIX keeps track of the owner of a file.
You find out how an object is owned by viewing the Ownership management tab, as shown in the figure below.
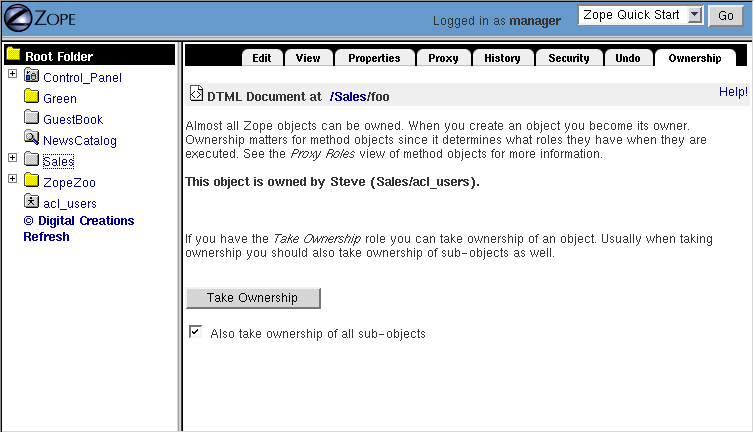
Managing ownership settings
This screen tells you if the object is owned and if so by whom. If the object is owned by someone else, and you have the Take ownership permission, you can take over the ownership of an object. You also have the option of taking ownership of all sub-objects by checking the Take ownership of all sub-objects box. Taking ownership is mostly useful if the owner account has been deleted, or if objects have been turned over to you for continued management.
As we mentioned earlier in the chapter, ownership affects security policies because users will have the local role Owner on objects they own. However, ownership also affects security because it controls the role’s executable content.
Note that due to the way Zope “grew up” that the list of users granted the Owner local role in the context of the object is not related to its actual “owner”. The concepts of the owner “role” and executable content ownership are distinct. Just because someone has the Owner local role in the context of an executable object does not mean that he is the owner of the object.
12.12.3. Roles of Executable Content
Python-based Scripts are said to be executable since their content is generated dynamically. Their content is also editable through the web.
When you view an executable object by visiting its URL or calling it from a script, Zope runs the object’s executable content. The objects actions are restricted by the roles of its owner and your roles. In other words an executable object can only perform actions that both the owner and the viewer are authorized for. This keeps an unprivileged user from writing a harmful script and then tricking a powerful user into executing the script. You can’t fool someone else into performing an action that you are not authorized to perform yourself. This is how Zope uses ownership to protect against server-side Trojan horse attacks.
It is important to note that an “unowned” object is typically no longer executable. If you experience problems running an executable object, make sure that its ownership settings are correct.
12.12.4. Proxy Roles
Sometimes Zope’s system of limiting access to executable objects isn’t exactly what you want. Sometimes you may wish to clamp down security on an executable object despite its ownership as a form of extra security. Other times you may want to provide an executable object with extra access to allow an unprivileged viewer to perform protected actions. Proxy roles provide you with a way to tailor the roles of an executable object.
Suppose you want to create a mail form that allows anonymous users to send email to the webmaster of your site. Sending email is protected by the ‘Use mailhost services’ permission. Anonymous users don’t normally have this permission and for good reason. You don’t want just anyone to be able to anonymously send email with your Zope server.
The problem with this arrangement is that your Script (Python) that sends email will fail for anonymous users. How can you get around this problem? The answer is to set the proxy roles on the Script (Python) that sends email so that when it executes it has the “Manager” role. Visit the Proxy management tab on your Python script, as shown in the figure below.
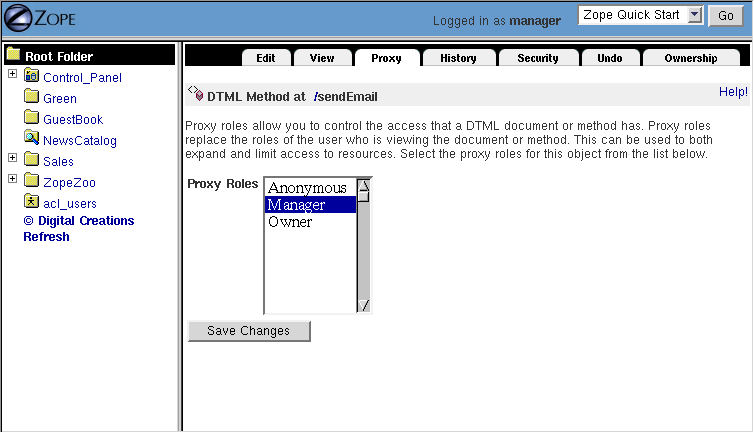
Proxy role management
Select Manager and click the Change button. This will set the proxy roles of the mail sending method to Manager. Note you must have the Manager role yourself to set it as a proxy role. Now when anyone, anonymous or not runs your mail sending method, it will execute with the Manager role, and thus will have authorization to send email.
Proxy roles define a fixed amount of permissions for executable content. Thus you can also use them to restrict security. For example, if you set the proxy roles of a script to Anonymous role, then the script will never execute as having any other roles besides Anonymous despite the roles of the owner and viewer.
Use Proxy roles with care, since they can be used to skirt the default security restrictions.
12.13. Summary
Security consists of two processes, authentication and authorization. User folders control authentication, and security policies control authorization. Zope security is intimately tied with the concept of location; users have location, security policies have location, even roles can have location. Creating an effective security architecture requires attention to location. When in doubt refer to the security usage patterns discussed in this chapter.