7. Using Basic Zope Objects
Attention
This document was written for Zope 2.
When building a web application with Zope, you construct the application with objects. The most fundamental Zope objects are explained in this chapter.
7.1. Basic Zope Objects
Zope ships with objects that help you perform different tasks. By design, different objects handle different parts of your application. Some objects hold your content data, such as word processor documents, spreadsheets, and images. Some objects handle your application’s logic by accepting input from a web form, or by executing a script. Some objects control the way your content is displayed, or presented to your viewer, for example, as a web page or via email.
In general, basic Zope objects take on one of three types of roles:
- Content
Zope objects like documents, images, and files hold different kinds of textual and binary data. In addition to objects in Zope containing content, Zope can work with content stored externally, such as information in a relational database.
- Presentation
You can control the look and feel of your site with Zope objects that act as web page “templates”. Zope comes with two facilities to help you manage presentation: Zope Page Templates (ZPT) and Document Templates (DTML). In the first part of the book we will only cover page templates and later on expand on document templates. If you already know HTML, page templates are easier to work with and more limited in their options. For some of the more advanced tasks DTML can be a better option as explained later on.
- Logic
Scripting business logic in Zope is done using Python. “Logic” is any kind of programming that does not involve presentation, but rather involves the carrying out of tasks such as changing objects, sending messages, testing conditions, and responding to events.
Zope also has other kinds of objects that fit into none of these categories, which are explored further in the chapter entitled Zope Services. You may also install “third party” Zope objects , defined in Python packages, to expand Zope’s capabilities. You can browse a list of packages specifically aimed at Zope at the Python Package Index.
7.2. Content Objects: Folders, Files, and Images
7.2.1. Folders
You’ve already met one of the fundamental Zope objects: the Folder. Folders are the basic building blocks of Zope. The purpose of a folder is simple: a Folder’s only job in life is to contain other objects.
Folders can contain any other kind of Zope object, including other folders. You can nest folders inside each other to form a tree of folders. This kind of “folder within a folder” arrangement provides your Zope site with structure. Good structure is very important, as Zope security and presentation is influenced by your site’s folder structure. Folder structure should be very familiar to anyone who has worked with files and folders on their computer using a file manager like Microsoft Windows Explorer.
7.2.2. Files
Zope Files contain raw data, just as the files on your computer do. Software, audio, video and documents are typically transported around the Internet and the world as files. A Zope File object is an analogue to these kinds of files. You can use Files to hold any kind of information that Zope doesn’t specifically support, such as Flash files, audio files, “tarballs”, etc.
Files do not consider their contents to be of any special format, textual or otherwise. Files are good for holding any kind of binary content, which is just raw computer information of some kind. Files are also good for holding textual content if the content doesn’t necessarily need to be edited through the web.
Every File object has a particular content type, which is a standard Internet MIME designation for different categories of content. Examples of content types are “text/plain” (plain text content), “text/html” (html text content), and “application/pdf” (an Adobe Portable Document Format file). When you upload a file into Zope, Zope tries to guess the content type from the name of the file.
7.2.2.1. Creating and Editing Files
To create a File object in your Zope instance, visit the root folder in the ZMI and choose File from Zope’s Add list. Before filling out the “id” or “title” of the File object, click the Browse button from the resulting “Add File” screen. This should trigger your browser to display a dialog box that allows you to choose a “real” file from your local computer, which will be uploaded to Zope when the “Add” button on the “Add File” form is selected. Try choosing a file on your local computer, such as a Word file (.doc) or a Portable Document Format (.pdf) file.
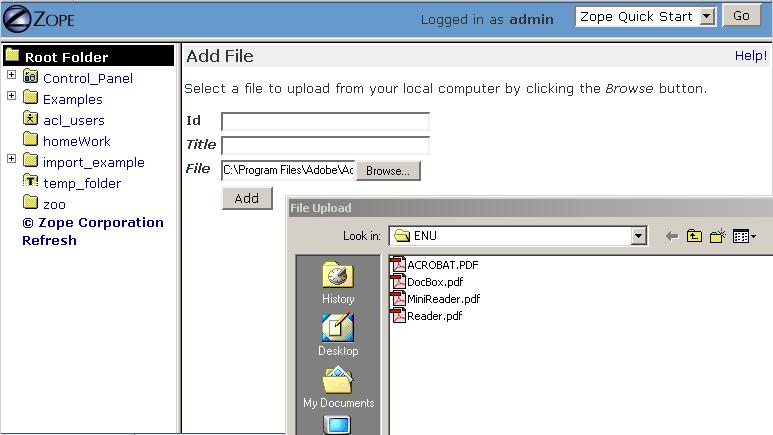
Adding a PDF File Object
Zope attempts to use the filename of the file you choose to upload as the File object’s ‘id’ and ‘title’, thus you don’t need to supply an ‘id’ or ‘title’ in the “Add File” form unless you want the File object to be named differently than the filename of the file on your local computer. After you select a file to upload, click Add. Depending on the size of the file you want to upload, it may take a few minutes to add the file to Zope.
After you add the File, a File object with the name of the file on your local computer will appear in the Workspace pane. Look at its Edit view. Here you will see that Zope has guessed the content type, as shown in the figure below.
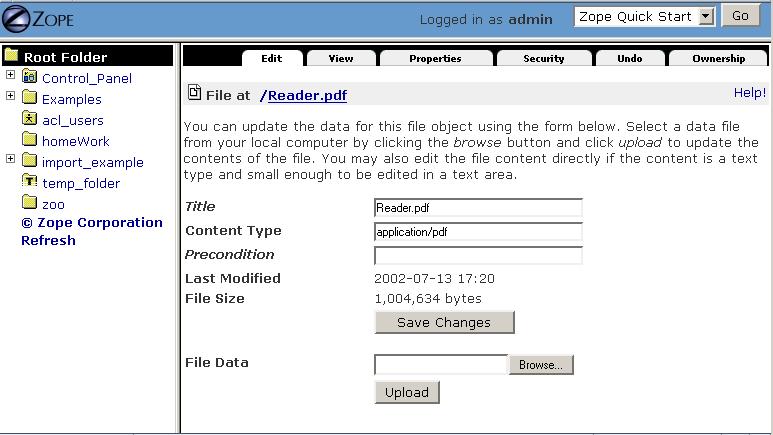
Editing an Uploaded PDF File Object
If you add a Word document, the content type is application/msword. If you add a PDF file, the content type is application/pdf. If Zope does not recognize the file type, it chooses the default, generic content type of application/octet-stream. Zope doesn’t always guess correctly, so the ability to change the content type of a File object is provided in the object editing interface. To change the content type of a File object, type the new content type into the Content Type field and click the Save Changes button.
You can change the contents of an existing File object by selecting a new file from your local filesystem in the File Data form element and clicking Upload.
7.2.2.2. Editing Text File Contents
If your File holds only text and is smaller than 64 kilobytes, Zope will allow you to edit its contents in a textarea within the Edit view of the ZMI. A text file is one that has a content-type that starts with text/, such as text/html, or text/plain.
7.2.2.3. Viewing Files
You can view a file in the Workspace frame by clicking the View tab in a File object’s management screen.
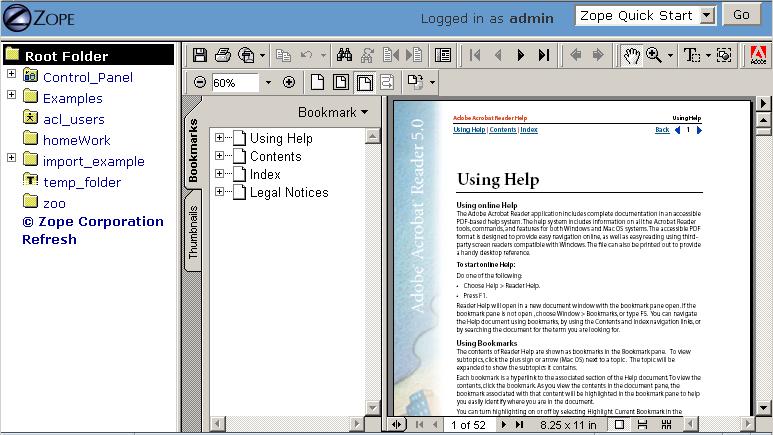
Viewing an Uploaded PDF File Object
You can also view a File by visiting its Zope URL. For example, if you have a file in your Zope root folder called Reader.pdf, you can view that file in your web browser via the URL http://localhost:8080/Reader.pdf. Depending on the type of file and your web browser’s configuration, your web browser may choose to display or download the file.
7.2.3. Images
Image objects contain the data from image files, such as GIF, JPEG, and PNG files. In Zope, Images are very similar to File objects, except that they include extra behavior for managing graphic content, such as an image’s width and height attributes.
Image objects use the same management interface as File objects. Everything in the previous section about using file objects also applies to images. In addition, Image objects display a preview of their images once they have been uploaded to Zope.
7.3. Presentation Objects: Zope Page Templates
Zope encourages you to keep your presentation and logic separate by providing different objects that are intended to be used expressly for “presentation”. “Presentation” is defined as the task of dynamically defining layout of web pages and other user-visible data. Presentation objects typically render HTML (and sometimes XML).
Zope has one “presentation” facility: Zope Page Templates (ZPT). Zope Page Templates are objects that allow you to define dynamic presentation for a web page. The HTML in your template is made dynamic by inserting special XML namespace elements into your HTML that define the dynamic behavior for that page.
ZPT has characteristics of a “server-side” scripting language, like SSI, PHP or JSP. This means that ZPT commands are executed by Zope on the server, and the result of that execution is sent to your web browser. By contrast, client-side scripting languages, like Javascript, are not processed by the server, but are rather sent to and executed by your web browser.
Zope also has an older version of a presentation facility included, which is called Document Template Markup Language or short DTML.
7.3.1. ZPT vs. DTML: Same Purpose, Different Approach
There is a major problem with many languages designed for the purpose of creating dynamic HTML content: they don’t allow for “separation of presentation and logic” very well. For example, “tag-based” scripting languages, like DTML, SSI, PHP, and JSP, encourage programmers to embed special tags into HTML that are, at best, mysterious to graphics designers who “just want to make the page look good” and don’t know (or want to know!) a lot about creating an application around the HTML that they generate. Worse, these tags can sometimes cause the HTML on which the designer has been working to become “invalid” HTML, unrecognizable by any of his or her tools.
Typically, when using these kinds of technologies, an HTML designer will “mock up” a page in a tool like Macromedia Dreamweaver or Adobe GoLive, and then hand it off to a web programmer, who will decorate the page with special tags to insert dynamic content. However, using tag-based scripting languages, this is a “one way” workflow: if the presentation ever needs to change, the programmer cannot just hand back the page that has been “decorated” with the special tags, because these tags will often be ignored or stripped out by the designer’s tools. One of several things needs to happen at this point to enact the presentation changes:
the designer mocks up a new page and the programmer re-embeds the dynamic tags “from scratch”, or
the designer hand-edits the HTML, working around the dynamic tags, or
the programmer does the presentation himself.
Clearly, none of these options are desirable, because neither the programmer nor the designer are doing the things that they are best at in the most efficient way.
Zope’s original dynamic presentation language was DTML. It soon became apparent that DTML was great at allowing programmers to quickly generate dynamic web pages, but it failed to allow programmers to work effectively together with non-technical graphics designers. Thus, ZPT was born. ZPT is an “attribute-based” presentation language that tries to allow for the “round-tripping” of templates between programmers and non-technical designers.
DTML is still fully supported in Zope. If you are familiar with PHP it might fit your mind better then ZPT. For some of the advanced topics covered later in the book, like relation database integration or more uncommon tasks like dynamic generation of non-xml files, DTML can be easier to work with.
7.3.2. Zope Page Templates
Zope Page Templates (ZPTs) are typically used to create dynamic HTML pages.
7.3.2.1. Creating a Page Template
Create a Folder with the ‘id’ Sales in the root folder, and give it any title you like. Enter the Sales folder by clicking on it, then select Page Template from the Add list. The Add form for a page template will be displayed. Specify the ‘id’ “SalesPage” and click Add. You have successfully created a page template whose content is standard “boilerplate” text at this point.
7.3.2.2. Editing a Page Template
The easiest way to edit a page template is by clicking on its name or icon in the ZMI. When you click on either one of those items, you are taken to the Edit view of the page template, which displays a textarea in which you can edit the template. Click on the “SalesPage” template. You will see something like the following screen:
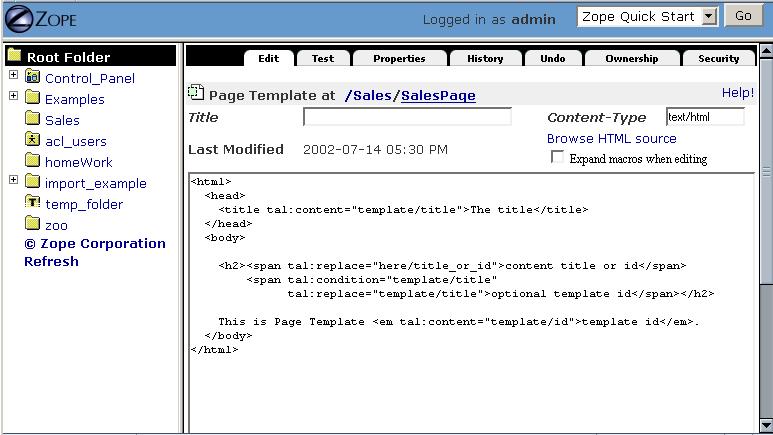
Default Page Template Content
Replace the original, boilerplate content included in the page template with the following HTML:
<html>
  <body>
    <h1>This is my first page template!</h1>
  </body>
</html>
Then click Save Changes at the bottom of the edit form.
7.3.2.3. Uploading a Page Template
If you’d prefer not to edit your HTML templates in a web browser, or you have some existing HTML pages that you’d like to bring into Zope, Zope allows you to upload your existing html files and convert them to page templates.
Create a text file on your local computer named ‘upload_pt.html’. Populate it with the following content:
<html>
  <body>
    <h1>This is my second page template!</h1>
  </body>
</html>
While in the Sales folder, choose Page Template from the add menu, which will cause the page template Add form to be displayed. The last form element on the add form is the Browse button. Click this button, and your browser will display a file selection dialog. CHoose the ‘upload_pt.html’ file, type in an ‘id’ of “upload_pt” for the new Page Template, and click Add and Edit. After uploading your file, you will be taken back to the Edit form of your new page template.
7.3.2.4. Viewing a Page Template
You can view a Page Template in the Workspace frame by clicking the Test tab from the template’s management screen. Click the Test tab of the SalesPage template, and you will see something like the following figure:

Viewing a Page Template
You can also view a Page Template by visiting its Zope URL directly.
7.4. Logic Objects: Script (Python) Objects and External Methods
“Logic” objects in Zope are objects that typically perform some sort of “heavy lifting” or “number crunching” in support of presentation objects. When they are executed, they need not return HTML or any other sort of structured presentation text. Instead, they might return values that are easy for a presentation object to format for display. For example, a logic object may return a “list” of “strings”. Then, a presentation object may “call in” to the logic object and format the results of the call into a one-column HTML table, where the rows of the table are populated by the strings. Instead of embedding logic in a presentation object, you can (and should) elect to move the logic into a logic object, using a presentation object only to format the result for display. In this manner, you can change or replace the presentation object without needing to “re-code” or replace the logic.
Note that logic objects, like presentation and content objects, are also addressable directly via a URL, and may elect to return HTML, which can be displayed meaningfully in a browser. However, the return value of a logic object can almost always be displayed in a browser, even if the logic object does not return HTML.
There are two kinds of logic objects supported by stock Zope: Script (Python) objects and External Methods. These stock logic objects are written in the syntax of the Python scripting language. Python is a general-purpose programming language. You are encouraged to read the Python Tutorial in order to understand the syntax and semantics of the example Script (Python) objects shown throughout this chapter and throughout this book. And don’t panic: Python is very easy to learn and understand.
One important Python feature that must be mentioned here, however: Python uses whitespace in the form of indentation to denote block structure. Where other languages, such as C, Perl, and PHP might use “curly braces” – “{” and “}” – to express a block of code, Python determines code blocks by examining the indentation of code text. If you’re used to other programming languages, this may take some “getting-used-to” (typically consisting of a few hours of unsavory spoken language ;-) ). If you have problems saving or executing Script objects, make sure to check your Script’s indentation.
7.4.1. Script (Python) Objects
Script (Python) objects are one type of logic object. Note that the tortuous form of their name (as opposed to “Python Script”) is unfortunate: a legal issue prevents Zope Corporation from naming them “Python Scripts”, but most folks at Zope Corporation and in the Zope community refer to them in conversation as just that.
Script (Python) objects are “security-constrained”, web-editable pieces of code that are written in a subset of the Python scripting language. Not all Python code is executable via a Script (Python) object. Script (Python) objects are constrained by Zope’s security policy, which means, for the most part, that they are unable to import all but a defined set of restricted Python modules, and that they cannot directly access files on your file system. This is a security feature, as it allows site administrators to safely delegate the ability to create logic in Python to less knowledgeable users. The security restrictions aren’t stringent enough to prevent malicious users from damaging the system. They are only meant as a safety belt beginners. For more information about Zope’s security features, see Users and Security.
7.4.1.1. Creating a Script (Python)
Enter the Sales folder you created earlier by clicking on it, then select Script (Python) from the Add list. The Add form for the object will be displayed. Specify the ‘id’ “SalesScript” and click Add. You will see an entry in the Sales folder Content view representing the “SalesScript” Script (Python) object, whose content is standard, boilerplate text at this point.
7.4.1.2. Editing a Script (Python)
The easiest way to edit a Script (Python) is by clicking on its name or icon in the ZMI: when you click on either of these items, you are taken to the Edit view of the Script (Python), which gives you a textarea in which you can edit the template. Click on the ‘SalesScript’ icon. You will see something like the following:
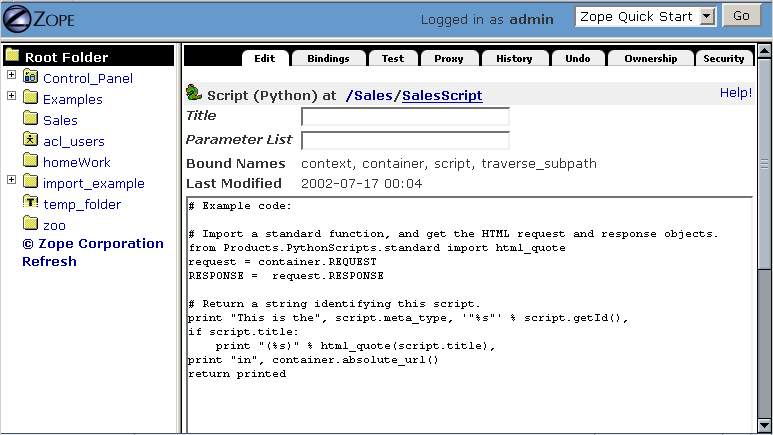
Default Script Content
In the Parameter List form element, type ‘name=”Chris”’.
Replace the original content that comes in the “body” (the big TEXTAREA below the ‘Last Modified’ line) of the Script (Python) object with the following text:
return 'Hello, %s from the SalesScript script' % name
Then click Save Changes at the bottom of the edit form. You can now execute, or test, your Script (Python) object.
7.4.1.3. Testing a Script (Python)
You can test a Script (Python) in the Workspace frame by clicking the Test tab from the Script’s management screen. When you test a script, the output of the script will be displayed in your browser. Script testing may require that you provide values for the script’s parameters before you can view the results. Click the Test tab of the SalesScript object, and you will see something like the following figure:
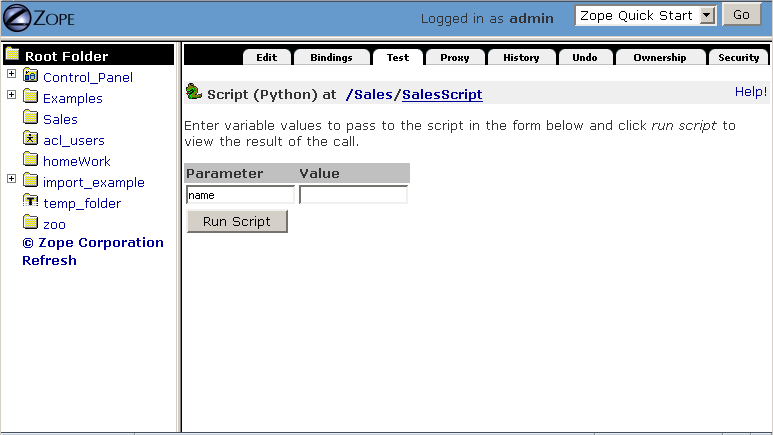
Testing a Script
In the Value box next to the ‘name’ parameter, enter your name, and then click “Run Script”. You will be presented with output in the Workspace frame not unlike:
Hello, [yourname] from the SalesScript script
If a Script does not require parameters or has defaults for its parameters (as does the example above), you may visit its URL directly to see its output. In our case, visiting the URL of SalesScript directly in your browser will produce:
Hello, Chris from the SalesScript script
If a Script does require or accept parameters, you may also influence its execution by visiting its URL directly and including a “query string”. In our case, visiting the URL ‘http://localhost:8080/Sales/SalesScript?name=Fred’ will produce the following output:
Hello, Fred from the SalesScript script
Zope maps query string argument values to their corresponding parameters automatically, as you can see by this output.
7.4.1.4. Uploading a Script (Python)
Uploading the body of a Script (Python) object is much like uploading the body of a Page Template. One significant difference is that Script (Python) objects interpret text that is offset by “double-pound” (‘##’) at the beginning of the text as data about their parameters, title, and “bindings”. For example, if you entered the following in a text editor and uploaded it, the lines that start with “double-pound” signs would be interpreted as parameter data, and the only text in the “body” would be the ‘return’ line. It would appear exactly as our SalesScript did:
## Script (Python) "SalesScript"
##bind container=container
##bind context=context
##bind namespace=
##bind script=script
##bind subpath=traverse_subpath
##parameters=name="Chris"
##title=
##
return 'Hello, %s from the SalesScript script' % name
You may see this view of a Script (Python) object by clicking on the ‘view or download’ link in the description beneath the “body” textarea.
You may also type the “double-pound” quoted text into the “body” textarea, along with the actual script lines, and the “double-pound” quoted text will be “auto-magically” turned into bindings and parameters for the Script (Python) object.
7.4.2. External Methods
External Method objects are another type of logic object. They are very similar to Script (Python) objects; in fact, they are scripted in the Python programming language, and they are used for the same purpose. There are a few important differences:
External Methods are not editable using the Zope Management Interface. Instead, their “modules” need to be created on the file system of your Zope server in a special subdirectory of your Zope directory named ‘Extensions’.
Because External Methods are not editable via the Zope Management Interface, their execution is not constrained by the Zope “security machinery”. This means that, unlike Script (Python) objects, External Methods can import and execute essentially arbitrary Python code and access files on your Zope server’s file system.
External Methods do not support the concept of “bindings” (which we have not discussed much yet, but please just make note for now).
External methods are often useful as an “escape hatch” when Zope’s security policy prevents you from using a Script (Python) object or DTML to do a particular job that requires more access than is “safe” in through-the-web-editable scripts. For example, a Script (Python) object cannot write to files on your server’s filesystem that an External Method may.
7.4.2.1. Testing an External Method Object
You can test an External Method in the Workspace frame by clicking the Test tab from the External Method’s management screen. When you test an External Method, its output is displayed in your browser. Unlike Script (Python) objects, External Methods provide no mechanism for specifying parameter values during testing. However, like Script (Python) objects, their output is influenced by values in a query string when you visit them directly.
Click the Test tab of the SalesEM object, and you will see something like the following figure:
Testing an External Method
If an External Method does not require parameters (or has defaults for its parameters, as in the example above), you may visit its URL directly to see its output.
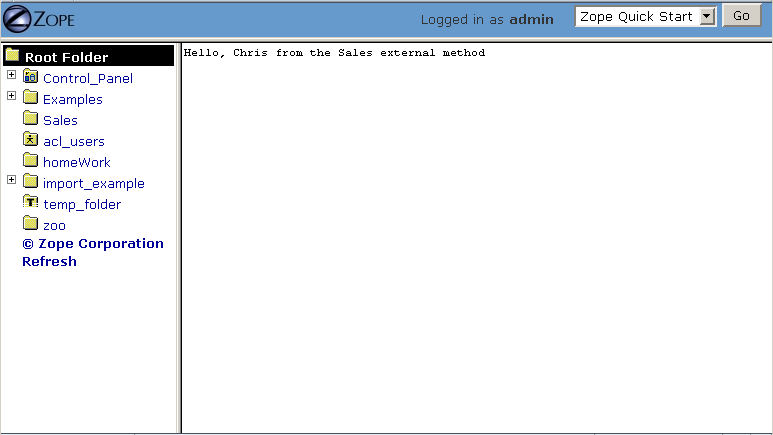
Provide alternate values via a query string to influence the execution of the External Method. For example, visiting the SalesEM external Method via ‘http://localhost:8080/Sales/SalesEM?name=Fred’ will display the following output:
Hello, Fred from the Sales external method
Astute readers will note that the ‘id’ provided by the output is not the ‘id’ of the External Method (‘SalesEM’), but is instead the ‘id’ of the “containing” folder, which is named ‘Sales’! This is a demonstration of the fact that External Methods (as well as Script (Python) objects) are mostly meant to be used in the “context” of another object, which is often a Folder. This is why they are named methods. Typically, you don’t often want to access information about the External Method or Script itself; all the “interesting” information is usually kept in other objects (like Folders). An External Method or Script (Python) object “knows about” its context and can display information about the context without much fuss.
7.4.2.2. Creating and Editing an External Method File
Minimize the browser you’re using to access the ZMI. In your Zope’s INSTANCE_HOME (the place where your Zope instance lives; see the Installation chapter for details), locate the subfolder named ‘Extensions’. Navigate into this folder and create a text file with the name ‘SalesEM.py’.
Within this file, save the following content:
def SalesEM(self, name="Chris"):
    id = self.id
    return 'Hello, %s from the %s external method' % (name, id)
7.4.2.3. Creating an External Method Object
Before you can use an External Method from within Zope, you need to create an External Method object in the ZMI that “refers to” the function in the file that you just created. Bring back your browser window and visit the ZMI. Navigate to the Sales folder and select External Method from the Add list. The Add form for an External Method will appear. Provide an ‘Id’ of “SalesEM”, a ‘Title’ of “Sales External Method”, a ‘Module Name’ of “SalesEM”, and a ‘Function Name’ of “SalesEM”.
Then click Add at the bottom of the Add form.
7.4.3. SQL Methods: Another Kind of Logic Object
SQL Methods are logic objects used to store and execute database queries that you can reuse in your web applications. We don’t explain them in this chapter, because we haven’t yet explained how to interface Zope with a relational database. SQL Methods are explained in the chapter entitled Relational Database Connectivity, where an example of creating a web application using a relational database is given.
7.5. Creating a Basic Zope Application Using Page Templates and Scripts
Here is a simple example of using Zope’s logic and content objects to build an online web form to help your users calculate the amount of compound interest on their debts. This kind of calculation involves the following procedure:
You need the following information: your current account balance (or debt), called the “principal”; the annual interest rate expressed as a decimal (like 0.095), called the “interest_rate”; the number of times during the year that interest is compounded (usually monthly), called the “periods”; and the number of years from now you want to calculate, called the “years”.
Divide your “interest_rate” by “periods” (usually 12). We’ll call this result “i”.
Take “periods” and multiply it by “years”. We’ll call this result “n”.
Raise (1 + “i”) to the power “n”.
Multiply the result by your “principal”. This is the new balance (or debt).
We will use Page Template and Script (Python) objects to construct an application to perform this task.
For this example, you will need two Page Templates with the ‘ids’ interestRateForm and interestRateDisplay, respectively, to collect and display information from the user. You will also need a Script (Python) object with an ‘id’ of calculateCompoundingInterest that will do the actual calculation.
The first step is to create a folder in which to hold the application. In your Zope’s root folder, create a folder with the ‘id’ “Interest”. You will create all of the objects that follow within this folder.
7.5.1. Creating a Data Collection Form
Visit the ‘Interest’ folder by clicking on it within the Zope Management Interface. Within the ‘Interest’ folder, create a Page Template with the ‘id’ interestRateForm that collects “principal”, “interest_rate”, “periods”, and “years” from your users. Use this text as the body of your interestRateForm page template:
<html>
  <body>

  <form action="interestRateDisplay" method="POST">
  <p>Please enter the following information:</p>

  Your current balance (or debt): <input name="principal:float"><br>
  Your annual interest rate: <input name="interest_rate:float"><br>
  Number of periods in a year: <input name="periods:int"><br>
  Number of years: <input name="years:int"><br>
  <input type="submit" value=" Calculate "><br>
  </form>

  </body>
</html>
This form collects information and, when it is submitted, calls the interestRateDisplay template (which we have not yet created).
7.5.2. Creating a Script To Calculate Interest Rates
Now, revisit the Contents view of the Interest folder and create a Script (Python) object with the id calculateCompoundingInterest that accepts four parameters: ‘principal’, ‘interest_rate’, ‘periods’, and ‘years’. Provide it with the following “body”:
"""
Calculate compounding interest.
"""
i = interest_rate / periods
n = periods * years
return ((1 + i) ** n) * principal
Remember: you enter the parameter names, separated by commas, into the Parameters List field, and the body into the body text area. Remember also that when you’re creating a Script (Python) object, you’re actually programming in the Python programming language, which is indentation-sensitive. Make sure each of the lines above line up along the left side of the text area, or you may get an error when you attempt to save it.
7.5.3. Creating a Page Template To Display Results
Next, go back to the Contents view of the Interest folder and create a Page Template with the id interestRateDisplay. This Page Template is called by interestRateForm and calls calculateCompoundingInterest. It also renders and returns the results:
<html>
  <body>
  Your total balance (or debt) including compounded interest over
  <span tal:define="years request/years;
                    principal request/principal;
                    interest_rate request/interest_rate;
                    periods request/periods">
    <span tal:content="years">2</span> years is:<br><br>
    <b>$
    <span tal:content="python: context.calculateCompoundingInterest(principal,
                                                     interest_rate,
                                                     periods,
                                                     years)" >1.00</span>
    </b>
  </span>
  </body>
</html>
7.5.4. Dealing With Errors
As in any programming venue, you will need to deal with errors. Nobody’s perfect! You may have already encountered some errors as you entered these scripts. Let’s explore errors a bit by way of an example. In our case, we cannot use the Page Template Test tab to test the interestRateDisplay without receiving an error, because it depends on the interestRateForm to supply it with the variables “years, “principal”, “interest_rate”, and “periods”. Thus, it is not directly “testable”. For the sake of “seeing the problem before it happens for real”, click the Test tab. Zope will present an error page with text not unlike the following text:
Site Error

An error was encountered while publishing this resource.

Error Type: KeyError
Error Value: years
This error message is telling you that your Page Template makes a reference to a variable “years” that it can’t find. You can view the full error by visiting the error_log object and clicking the top-most error log entry, which will be named KeyError: years in the Log tab. The error log entry contains information about the error, including the time, the user who received the error, the URL that caused the error to happen, the exception type, the exception value, and a “Traceback”, which typically gives you enough technical information to understand what happened. In our case, the part of the traceback that is interesting to us is:
* Module Products.PageTemplates.TALES, line 217, in evaluate
  URL: /Interest/interestRateDisplay
  Line 4, Column 8
  Expression: standard:'request/years'
This tells us that the failure occurred when the Page Template attempted to access the variable ‘request/years’. We know why: there is no variable ‘request/years’, because that variable is only “filled in” as a result of posting via our interestRateForm, which calls in to our interestRateDisplay Page Template, which has the effect of inserting the variables ‘principal’, ‘interest_rate’, ‘periods’, and ‘years’ into the ‘request’ “namespace”. We’ll cover Page Template namespaces in a succeeding chapter.
7.5.5. Using The Application
Let’s use the application you’ve just created. Visit the interestRateForm Page Template and click the Test tab.
Type in ‘20000’ for balance or debt, ‘.06’ for interest rate, ‘4’ for periods in a year, and ‘20’ for number of years, and then click Calculate. This will cause interestRateForm to submit the collect information to interestRateDisplay, which calls the Script (Python) object named calculateCompoundingInterest. The display method uses the value returned by the script in the resulting display. You will see the following result:
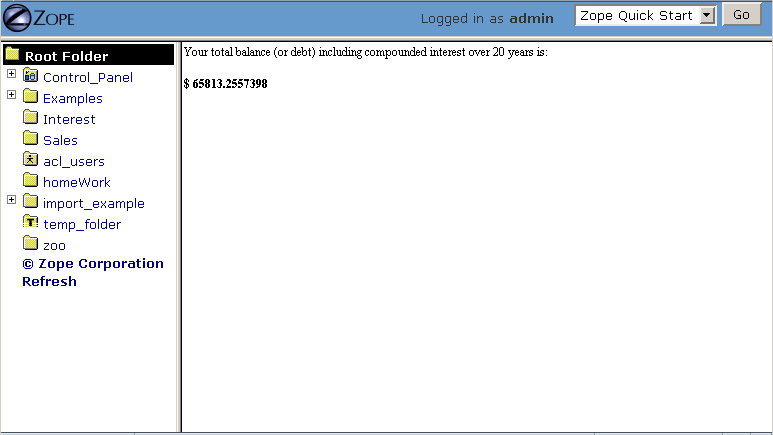
Result of the Interest Application
If you see something close to this, it calls for congratulations, because you’ve just built your first Zope application successfully! If you are having trouble, try to troubleshoot the application by using the tips in the section “Dealing With Errors.” If you’re stuck entirely, it’s advisable that you send a message to the Zope mailing list detailing the problem that you’re having as concisely and clearly as possible. It is likely that someone there will be able to help you, and it is polite to subscribe to the Zope mailing list itself if you want to receive replies. See https://mail.zope.dev/mailman/listinfo/zope for information about how to subscribe to the Zope (zope@zope.dev) mailing list.