17. Advanced DTML
Attention
This document was written for Zope 2.
DTML is the kind of language that appears to “do what you mean.” That is good when it does what you actually want it to do, but when it does something you don’t want to do, well, it’s no fun at all. This chapter tells you how to make DTML do what you really mean. When you’re done reading this chapter you will be able to write DTML that will accomplish a number of complex tasks including:
Inspect and Modify the REQUEST object
Modify the current namespace
Call other scripts from within DTML
Send email with or without MIME attachments
Handle exceptions within DTML
A few of caveats before getting started:
It’s a good idea to know something about Python before diving into advanced DTML or any other advanced area of Zope.
Understand the Zope acquisition model and how it works.
If you are writing very complex functionality in DTML, consider using a Python Script. This will ease maintenance, not to mention readability.
Understand the difference between a DTML Document and a DTML Method before embarking on building a huge site. See the explanation included in this chapter.
It’s no lie that DTML has a reputation for complexity. While it is true that DTML is really simple if all you want to do is simple layout, using DTML for more advanced tasks requires an understanding of where DTML variables come from.
Here’s a very tricky error that almost all newbies encounter. Imagine you have a DTML Document called zooName. This document contains an HTML form like the following:
<dtml-var standard_html_header>

  <dtml-if zooName>

    <p><dtml-var zooName></p>

  <dtml-else>

    <form action="<dtml-var URL>" method="GET">
      <input name="zooName">
      <input type="submit" value="What is zooName?">
    </form>

  </dtml-if>

<dtml-var standard_html_footer>
This looks simple enough, the idea is, this is an HTML page that calls itself. This is because the HTML action is the URL variable, which will become the URL of the DTML Document.
If there is a ‘zooName’ variable, then the page will print it, if there isn’t, it shows a form that asks for it. When you click submit, the data you enter will make the “if” evaluate to true, and this code should print what was entered in the form.
But unfortunately, this is one of those instances where DTML will not do what you mean, because the name of the DTML Document that contains this DTML is also named zooName, and it doesn’t use the variable out of the request, it uses itself, which causes it to call itself and call itself, ad infinitum, until you get an “excessive recursion” error. So instead of doing what you really meant, you got an error. This is what confuses beginners. In the next couple of sections, we’ll show you how to fix this example to do what you mean.
17.1. How Variables are Looked up
There are actually two ways to fix the DTML error in the zooName document. The first is that you can rename the document to something like zopeNameFormOrReply and always remember this special exception and never do it; never knowing why it happens. The second is to understand how names are looked up, and to be explicit about where you want the name to come from in the namespace.
The DTML namespace is a collection of objects arranged in a stack. A stack is a list of objects that can be manipulated by pushing and popping objects on to and off of the stack.
When a DTML Document or DTML Method is executed, Zope creates a DTML namespace to resolve DTML variable names. It’s important to understand the workings of the DTML namespace so that you can accurately predict how Zope will locate variables. Some of the trickiest problems you will run into with DTML can be resolved by understanding the DTML namespace.
When Zope looks for names in the DTML namespace stack it first looks at the topmost object in the stack. If the name can’t be found there, then the next item down is introspected. Zope will work its way down the stack, checking each object in turn until it finds the name that it is looking for.
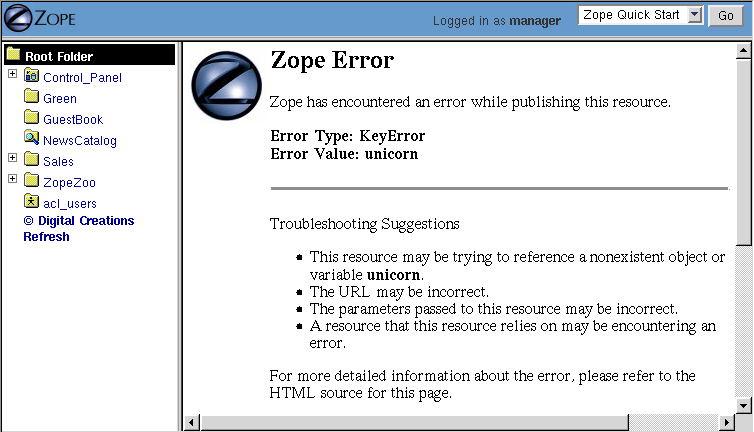
If Zope gets all the way down to the bottom of the stack and can’t find what it is looking for, then an error is generated. For example, try looking for the non-existent name, unicorn:
<dtml-var unicorn>
As long as there is no variable named unicorn viewing this DTML will return an error, as shown in the figure below.
DTML error message indicating that it cannot find a variable
But the DTML stack is not all there is to names because DTML doesn’t start with an empty stack, before you even begin executing DTML in Zope there are already a number of objects pushed on the namespace stack.
17.2. DTML Namespaces
DTML namespaces are built dynamically for every request in Zope. When you call a DTML Method or DTML Document through the web, the DTML namespace starts with the same first two stack elements; the client object and the request, as shown in the figure below.
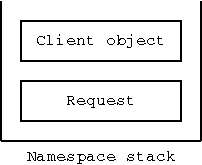
Initial DTML namespace stack
The client object is the first object on the top of the DTML namespace stack when entering a transaction (note: commands exist to push additional parameters onto the namespace stack during a thread of execution). What the client object is depends on whether you are executing a DTML Method or a DTML Document. In our example above, this means that the client object is named zooName. Which is why it breaks. The form input that we really wanted comes from the web request, but the client is looked at first.
The request namespace is always on the bottom of the DTML namespace stack, and is therefore the last namespace to be looked in for names. This means that we must be explicit in our example about which namespace we want. We can do this with the DTML ‘with’ tag:
<dtml-var standard_html_header>

  <dtml-with REQUEST only>
    <dtml-if zooName>
      <p><dtml-var zooName></p>
    <dtml-else>
      <form action="<dtml-var URL>" method="GET">
        <input name="zooName">
        <input type="submit" value="What is zooName?">
      </form>
    </dtml-if>
  </dtml-with>

<dtml-var standard_html_footer>
Here, the with tag says to look in the ‘REQUEST’ namespace, and only the ‘REQUEST’ namespace, for the name “zooName”.
17.2.1. DTML Client Object
The client object in DTML depends on whether or not you are executing a DTML Method or a DTML Document. In the case of a Document, the client object is always the document itself, or in other words, a DTML Document is its own client object.
A DTML Method however can have different kinds of client objects depending on how it is called. For example, if you had a DTML Method that displayed all of the contents of a folder then the client object would be the folder that is being displayed. This client object can change depending on which folder the method in question is displaying. For example, consider the following DTML Method named list in the root folder:
<dtml-var standard_html_header>

<ul>
<dtml-in objectValues>
  <li><dtml-var title_or_id></li>
</dtml-in>
</ul>

<dtml-var standard_html_footer>
Now, what this method displays depends upon how it is used. If you apply this method to the Reptiles folder with the URL ‘http://localhost:8080/Reptiles/list’, then you will get something that looks like the figure below.
Applying the list method to the Reptiles folder
But if you were to apply the method to the Birds folder with the URL http://localhost:8080/Birds/list then you would get something different, only two items in the list, Parrot and Raptors.
Same DTML Method, different results. In the first example, the client object of the list method was the Reptiles folder. In the second example, the client object was the Birds folder. When Zope looked up the objectValues variable, in the first case it called the objectValues method of the Reptiles folder, in the second case it called the objectValues method of the Birds folder.
In other words, the client object is where variables such as methods, and properties are looked up first.
As you saw in “Dynamic Content with DTML”, if Zope cannot find a variable in the client object, it searches through the object’s containers. Zope uses acquisition to automatically inherit variables from the client object’s containers. So when Zope walks up the object hierarchy looking for variables it always starts at the client object, and works its way up from there.
17.2.2. DTML Method vs. DTML Document
One of the most potentially confusing choices to make for Zope newbies is the choice between a DTML Method and a DTML Document. Unfortunately, many Zope newbies develop entire sites using one type of object only to discover that they should have used the other type. In general, keep the following items in mind when deciding upon which type to use:
- Does the object require properties of its own? If so,
use a DTML Document since DTML Methods have no inherent properties.
- Does the object need to be called as a “page”? If so,
consider using a DTML Document since it will be easier to control such items as page title by using properties.
- Does the object need transparency to its context? If so,
you should probably use a DTML Method since these objects act as though they are directly attached to their calling, or containing object.
17.2.3. DTML Request Object
The request object is the bottom object on the DTML namespace stack. The request contains all of the information specific to the current web request.
Just as the client object uses acquisition to look in a number of places for variables, so too the request looks up variables in a number of places. When the request looks for a variable it consults these sources in order:
Variables explicitly set on the request.
Special variables. The REQUEST namespace provides you with special information, such as the URL of the current object and all of its parents.
The CGI environment. The Common Gateway Interface, or CGI interface defines a standard set of environment variables to be used by dynamic web scripts. These variables are provided by Zope in the REQUEST namespace.
Form data. If the current request is a form action, then any form input data that was submitted with the request can be found in the REQUEST object.
Cookies. If the client of the current request has any cookies these can be found in the current REQUEST object.
The request namespace is very useful in Zope since it is the primary way that clients (in this case, web browsers) communicate with Zope by providing form data, cookies and other information about themselves. For more information about the request object, see Appendix B.
A very simple and enlightening example is to simply render the REQUEST object in a DTML Document or Method:
<dtml-var standard_html_header>

<dtml-var REQUEST>

<dtml-var standard_html_footer>
Try this yourself, you should get something that looks like the figure below.
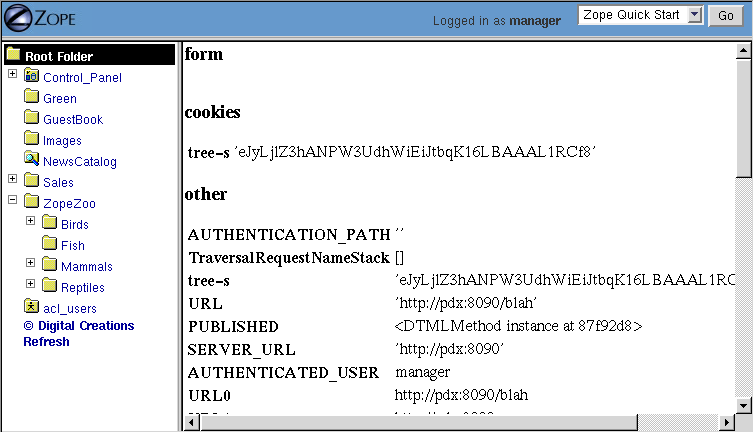
Displaying the request
Since the request comes after the client object, if there are names that exist in both the request and the client object, DTML will always find them first in the client object. This can be a problem. Next, let’s look at some ways to get around this problem by controlling more directly how DTML looks up variables.
17.3. Rendering Variables
When you insert a variable using the var tag, Zope first looks up the variable using the DTML namespace, it then renders it and inserts the results. Rendering means turning an object or value into a string suitable for inserting into the output. Zope renders simple variables by using Python’s standard method for coercing objects to strings. For complex objects such as DTML Methods and SQL Methods, Zope will call the object instead of just trying to turn it into a string. This allows you to insert DTML Methods into other DTML Methods.
In general Zope renders variables in the way you would expect. It’s only when you start doing more advanced tricks that you become aware of the rendering process. Later in this chapter we’ll look at some examples of how to control rendering using the ‘getitem’ DTML utility function.
17.4. Modifying the DTML Namespace
Now that you know the DTML namespace is a stack, you may be wondering how, or even why, new objects get pushed onto it.
Some DTML tags modify the DTML namespace while they are executing. A tag may push some object onto the namespace stack during the course of execution. These tags include the in tag, the with tag, and the let tag.
17.4.1. In Tag Namespace Modifications
When the in tag iterates over a sequence it pushes the current item in the sequence onto the top of the namespace stack:
<dtml-var getId> <!-- This is the id of the client object -->

<dtml-in objectValues>

  <dtml-var getId> <!-- this is the id of the current item in the
                     objectValues sequence -->
</dtml-in>
You’ve seen this many times throughout the examples in this book. While the in tag is iterating over a sequence, each item is pushed onto the namespace stack for the duration of the contents of the in tag block. When the block is finished executing, the current item in the sequence is popped off the DTML namespace stack and the next item in the sequence is pushed on.
17.4.1.1. Additional Notes
To be more accurate, the in tag pushes a number of items onto the namespace stack. These include sequence variables, grouping variables, and batch variables in addition to the object itself. Some of those variables are:
sequence-item: The current item within the iteration.
sequence-start: True if the current item is the first item in the sequence.
- sequence-end: True if the current item is the last item in
the sequence.
sequence-length: The length of the sequence.
previous-sequence: True on the first iteration if the current batch is not the first one. Batch size is set with the size attribute.
next-sequence: True on the last iteration if the current batch is not the last batch.
There are many more variables available when using the in tag. See Appendix A for more detail.
17.4.2. The With Tag
The with tag pushes an object that you specify onto the namespace stack for the duration of the with block. This allows you to specify where variables should be looked up first. When the with block closes, the object is popped off the namespace stack.
Consider a folder that contains a bunch of methods and properties that you are interested in. You could access those names with Python expressions like this:
<dtml-var standard_html_header>

<dtml-var expr="Reptiles.getReptileInfo()">
<dtml-var expr="Reptiles.reptileHouseMaintainer">

<dtml-in expr="Reptiles.getReptiles()">
  <dtml-var species>
</dtml-in>

<dtml-var standard_html_footer>
Notice that a lot of complexity is added to the code just to get things out of the Reptiles folder. Using the with tag you can make this example much easier to read:
<dtml-var standard_html_header>

<dtml-with Reptiles>

  <dtml-var getReptileInfo>
  <dtml-var reptileHouseMaintainer>

  <dtml-in getReptiles>
    <dtml-var species>
  </dtml-in>

</dtml-with>

<dtml-var standard_html_footer>
Another reason you might want to use the with tag is to put the request, or some part of the request on top of the namespace stack. For example suppose you have a form that includes an input named id. If you try to process this form by looking up the id variable like so:
<dtml-var id>
You will not get your form’s id variable, but the client object’s id. One solution is to push the web request’s form on to the top of the DTML namespace stack using the with tag:
<dtml-with expr="REQUEST.form">
  <dtml-var id>
</dtml-with>
This will ensure that you get the form’s id first. See Appendix B for complete API documentation of the request object.
If you submit your form without supplying a value for the id input, the form on top of the namespace stack will do you no good, since the form doesn’t contain an id variable. You’ll still get the client object’s id since DTML will search the client object after failing to find the id variable in the form. The with tag has an attribute that lets you trim the DTML namespace to only include the object you pushed onto the namespace stack:
<dtml-with expr="REQUEST.form" only>
  <dtml-if id>
    <dtml-var id>
  <dtml-else>
    <p>The form didn't contain an "id" variable.</p>
  </dtml-if>
</dtml-with>
Using the only attribute allows you to be sure about where your variables are being looked up.
17.4.3. The Let Tag
The let tag lets you push a new namespace onto the namespace stack. This namespace is defined by the tag attributes to the let tag:
<dtml-let person="'Bob'" relation="'uncle'">
  <p><dtml-var person>'s your <dtml-var relation>.</p>
</dtml-let>
This would display:
<p>Bob's your uncle.</p>
The let tag accomplishes much of the same goals as the with tag. The main advantage of the let tag is that you can use it to define multiple variables to be used in a block. The let tag creates one or more new name-value pairs and pushes a namespace object containing those variables and their values on to the top of the DTML namespace stack. In general the with tag is more useful to push existing objects onto the namespace stack, while the let tag is better suited for defining new variables for a block.
When you find yourself writing complex DTML that requires things like new variables, there’s a good chance that you could do the same thing better with Python or Perl. Advanced scripting is covered in the chapter entitled Advanced Zope Scripting .
The DTML namespace is a complex place, and this complexity evolved over a lot of time. Although it helps to understand where names come from, it is much more helpful to always be specific about where you are looking for a name. The ‘with’ and ‘let’ tags let you alter the namespace in order to obtain references to the objects you need.
17.5. DTML Namespace Utility Functions
Like all things in Zope, the DTML namespace is an object, and it can be accessed directly in DTML with the _ (underscore) object. The _ namespace is often referred to as “the under namespace”.
The under namespace provides you with many useful methods for certain programming tasks. Let’s look at a few of them.
Say you wanted to print your name three times. This can be done with the in tag, but how do you explicitly tell the in tag to loop three times? Just pass it a sequence with three items:
<dtml-var standard_html_header>

<ul>
<dtml-in expr="_.range(3)">
  <li><dtml-var sequence-item>: My name is Bob.</li>
</dtml-in>
</ul>

<dtml-var standard_html_footer>
The ‘_.range(3)’ Python expression will return a sequence of the first three integers, 0, 1, and 2. The range function is a standard Python built-in and many of Python’s built-in functions can be accessed through the _ namespace, including:
- ‘range([start,], stop, [step])’
Returns a list of integers from ‘start’ to ‘stop’ counting ‘step’ integers at a time. ‘start’ defaults to 0 and ‘step’ defaults to 1. For example:
- ‘_.range(3,10,2)’
gives ‘[3,5,7,9]’.
- ‘_.len(sequence)’
‘len’ returns the size of sequence as an integer.
Many of these names come from the Python language, which contains a set of special functions called ‘built-ins’. The Python philosophy is to have a small number of built-in names. The Zope philosophy can be thought of as having a large, complex array of built-in names.
The under namespace can also be used to explicitly control variable look up. There is a very common usage of this syntax. As mentioned above the in tag defines a number of special variables, like sequence-item and sequence-key that you can use inside a loop to help you display and control it. What if you wanted to use one of these variables inside a Python expression?:
<dtml-var standard_html_header>

<h1>The squares of the first three integers:</h1>
<ul>
<dtml-in expr="_.range(3)">
  <li>The square of <dtml-var sequence-item> is:
    <dtml-var expr="sequence-item * sequence-item">
  </li>
</dtml-in>
</ul>

<dtml-var standard_html_footer>
Try this, does it work? No! Why not? The problem lies in this var tag:
<dtml-var expr="sequence-item * sequence-item">
Remember, everything inside a Python expression attribute must be a valid Python expression. In DTML, sequence-item is the name of a variable, but in Python this means “The object sequence minus the object item”. This is not what you want.
What you really want is to look up the variable sequence-item. One way to solve this problem is to use the in tag prefix attribute. For example:
<dtml-var standard_html_header>

<h1>The squares of the first three integers:</h1>
<ul>
<dtml-in prefix="loop" expr="_.range(3)">
  <li>The square of <dtml-var loop_item> is:
    <dtml-var expr="loop_item * loop_item">
  </li>
</dtml-in>
</ul>

<dtml-var standard_html_footer>
The prefix attribute causes in tag variables to be renamed using the specified prefix and underscores, rather than using “sequence” and dashes. So in this example, “sequence-item” becomes “loop_item”. See Appendix A for more information on the prefix attribute.
Another way to look up the variable sequence-item in a DTML expression is to use the getitem utility function to explicitly look up a variable:
The square of <dtml-var sequence-item> is:
<dtml-var expr="_.getitem('sequence-item') *
                _.getitem('sequence-item')">
The getitem function takes the name to look up as its first argument. Now, the DTML Method will correctly display the square of the first three integers. The getitem method takes an optional second argument which specifies whether or not to render the variable. Recall that rendering a DTML variable means turning it into a string. By default the getitem function does not render a variable.
Here’s how to insert a rendered variable named myDoc:
<dtml-var expr="_.getitem('myDoc', 1)">
This example is in some ways rather pointless, since it’s the functional equivalent to:
<dtml-var myDoc>
However, suppose you had a form in which a user got to select which document they wanted to see from a list of choices. Suppose the form had an input named selectedDoc which contained the name of the document. You could then display the rendered document like so:
<dtml-var expr="_.getitem(selectedDoc, 1)">
Notice in the above example that selectedDoc is not in quotes. We don’t want to insert the text selectedDoc we want to insert the value of the variable named selectedDoc. For example, the value of selectedDoc might be ‘chapterOne’. Using this method, you can look up an item using a dynamic value instead of static text.
If you are a python programmer and you begin using the more complex aspects of DTML, consider doing a lot of your work in Python scripts that you call from DTML. This is explained more in the chapter entitled Advanced Zope Scripting. Using Python sidesteps many of the issues in DTML.
17.6. DTML Security
Zope can be used by many different kinds of users. For example, the old Zope site, preserved at old.zope.dev, had over 11,000 community members when it was active. Each member was able to log into Zope, add objects and news items, and manage their own personal area.
Because DTML is a scripting language, it is very flexible about working with objects and their properties. If there were no security system that constrained DTML then a user could potentially create malicious or privacy-invading DTML code.
DTML is restricted by standard Zope security settings. So if you don’t have permission to access an object by going to its URL you also don’t have permission to access it via DTML. You can’t use DTML to trick the Zope security system.
For example, suppose you have a DTML Document named Diary which is private. Anonymous users can’t access your diary via the web. If an anonymous user views DTML that tries to access your diary they will be denied:
<dtml-var Diary>
DTML verifies that the current user is authorized to access all DTML variables. If the user does not have authorization, then the security system will raise an Unauthorized error and the user will be asked to present more privileged authentication credentials.
In the chapter entitled Users and Security , you read about security rules for executable content. There are ways to tailor the roles of a DTML Document or Method to allow it to access restricted variables regardless of the viewer’s roles.
17.7. Safe Scripting Limits
DTML will not let you gobble up memory or execute infinite loops and recursions. Because the restrictions on looping and memory use are relatively tight, DTML is not the right language for complex, expensive programming logic. For example, you cannot create huge lists with the _.range utility function. You also have no way to access the filesystem directly in DTML.
Keep in mind however that these safety limits are simple and can be outsmarted by a determined user. It’s generally not a good idea to let anyone you don’t trust write DTML code on your site.
17.9. The Call Tag
The var tag can call methods, but it also inserts the return value. Using the call tag you can call methods without inserting their return value into the output. This is useful if you are more interested in the effect of calling a method rather than its return value.
For example, when you want to change the value of a property, animalName, you are more interested in the effect of calling the manage_changeProperties method than the return value the method gives you. Here’s an example:
<dtml-if expr="REQUEST.has_key('animalName')">
  <dtml-call expr="manage_changeProperties(animalName=REQUEST['animalName'])">
  <h1>The property 'animalName' has changed</h1>
<dtml-else>
  <h1>No properties were changed</h1>
</dtml-if>
In this example, the page will change a property depending on whether a certain name exists. The result of the manage_changeProperties method is not important and does not need to be shown to the user.
Another common usage of the call tag is calling methods that affect client behavior, like the ‘RESPONSE.redirect’ method. In this example, you make the client redirect to a different page, to change the page that gets redirected, change the value for the “target” variable defined in the let tag:
<dtml-var standard_html_header>

<dtml-let target="'http://example.com/new_location.html'">

  <h1>This page has moved, you will now be redirected to the
  correct location.  If your browser does not redirect, click <a
  href="<dtml-var target>"><dtml-var target></a>.</h1>

  <dtml-call expr="RESPONSE.redirect(target)">

</dtml-let>

<dtml-var standard_html_footer>
In short, the call tag works exactly like the var tag with the exception that it doesn’t insert the results of calling the variable.
Another possibility for use of the call tag would be to call a ZSQL Method or or preprocess the REQUEST. Two examples of calling a ZSQL method:
<dtml-call "insertLogEntry(REQUEST)">
or:
<dtml-call "insertLogEntry(logInfo=REQUEST.get('URL0'), severity=1)">
To call a python script that might do any number of things, including preprocessing the REQUEST:
<dtml-call "preprocess(REQUEST)">
17.10. The Comment Tag
DTML can be documented with comments using the comment tag:
<dtml-var standard_html_header>

<dtml-comment>

  This is a DTML comment and will be removed from the DTML code
  before it is returned to the client.  This is useful for
  documenting DTML code.  Unlike HTML comments, DTML comments
  are NEVER sent to the client.

</dtml-comment>

<!--

  This is an HTML comment, this is NOT DTML and will be treated
  as HTML and like any other HTML code will get sent to the
  client.  Although it is customary for an HTML browser to hide
  these comments from the end user, they still get sent to the
  client and can be easily seen by 'Viewing the Source' of a
  document.

-->

<dtml-var standard_html_footer>
The comment block is removed from DTML output.
In addition to documenting DTML you can use the comment tag to temporarily comment out other DTML tags. Later you can remove the comment tags to re-enable the DTML.
17.11. The Tree Tag
The tree tag lets you easily build dynamic trees in HTML to display hierarchical data. A tree is a graphical representation of data that starts with a “root” object that has objects underneath it often referred to as “branches”. Branches can have their own branches, just like a real tree. This concept should be familiar to anyone who has used a file manager program like Microsoft Windows Explorer to navigate a file system. And, in fact, the left hand “navigation” view of the Zope management interface is created using the tree tag.
For example here’s a tree that represents a collection of folders and sub-folders.

HTML tree generated by the tree tag
Here’s the DTML that generated this tree display:
<dtml-var standard_html_header>

<dtml-tree>

  <dtml-var getId>

</dtml-tree>

<dtml-var standard_html_footer>
The tree tag queries objects to find their sub-objects and takes care of displaying the results as a tree. The tree tag block works as a template to display nodes of the tree.
Now, since the basic protocol of the web, HTTP, is stateless, you need to somehow remember what state the tree is in every time you look at a page. To do this, Zope stores the state of the tree in a cookie. Because this tree state is stored in a cookie, only one tree can appear on a web page at a time, otherwise they will confusingly use the same cookie.
You can tailor the behavior of the tree tag quite a bit with tree tag attributes and special variables. Here is a sampling of tree tag attributes.
- branches
The name of the method used to find sub-objects. This defaults to tpValues, which is a method defined by a number of standard Zope objects.
- leaves
The name of a method used to display objects that do not have sub-object branches.
- nowrap
Either 0 or 1. If 0, then branch text will wrap to fit in available space, otherwise, text may be truncated. The default value is 0.
- sort
Sort branches before text insertion is performed. The attribute value is the name of the attribute that items should be sorted on.
- assume_children
Either 0 or 1. If 1, then all objects are assumed to have sub-objects, and will therefore always have a plus sign in front of them when they are collapsed. Only when an item is expanded will sub-objects be looked for. This could be a good option when the retrieval of sub-objects is a costly process. The defalt value is 0.
- single
Either 0 or 1. If 1, then only one branch of the tree can be expanded. Any expanded branches will collapse when a new branch is expanded. The default value is 0.
- skip_unauthorized
Either 0 or 1. If 1, then no errors will be raised trying to display sub-objects for which the user does not have sufficient access. The protected sub-objects are not displayed. The default value is 0.
Suppose you want to use the tree tag to create a dynamic site map. You don’t want every page to show up in the site map. Let’s say that you put a property on folders and documents that you want to show up in the site map.
Let’s first define a Script with the id of publicObjects that returns public objects:
## Script (Python) "publicObjects"
##
"""
Returns sub-folders and DTML documents that have a
true 'siteMap' property.
"""
results=[]
for object in context.objectValues(['Folder', 'DTML Document']):
    if object.hasProperty('siteMap') and object.siteMap:
        results.append(object)
return results
Now we can create a DTML Method that uses the tree tag and our Scripts to draw a site map:
<dtml-var standard_html_header>

<h1>Site Map</h1>

<p><a href="&dtml-URL0;?expand_all=1">Expand All</a> |
   <a href="&dtml-URL0;?collapse_all=1">Collapse All</a>
</p>

<dtml-tree branches="publicObjects" skip_unauthorized="1">
  <a href="&dtml-absolute_url;"><dtml-var title_or_id></a>
</dtml-tree>

<dtml-var standard_html_footer>
This DTML Method draws a link to all public resources and displays them in a tree. Here’s what the resulting site map looks like.
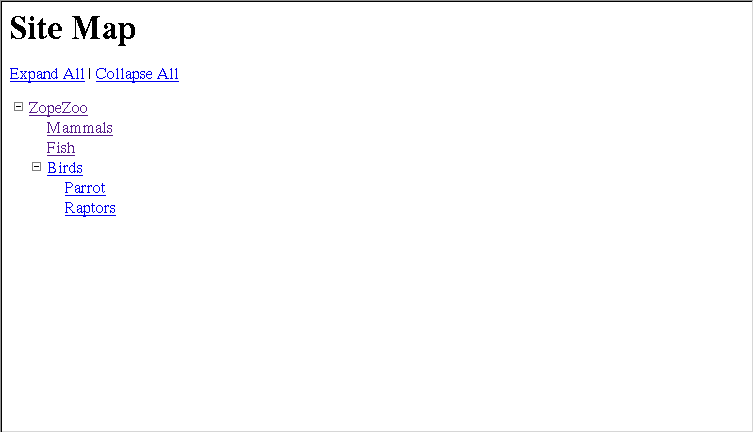
Dynamic site map using the tree tag
For a summary of the tree tag arguments and special variables see Appendix A.
17.12. The Return Tag
In general DTML creates textual output. You can however, make DTML return other values besides text. Using the return tag you can make a DTML Method return an arbitrary value just like a Python or Perl-based Script.
Here’s an example:
<p>This text is ignored.</p>

<dtml-return expr="42">
This DTML Method returns the number 42.
Another upshot of using the return tag is that DTML execution will stop after the return tag.
If you find yourself using the return tag, you almost certainly should be using a Script instead. The return tag was developed before Scripts, and is largely useless now that you can easily write scripts in Python and Perl.
17.13. The Sendmail Tag
The sendmail tag formats and sends a mail messages. You can use the sendmail tag to connect to an existing Mail Host, or you can manually specify your SMTP host.
Here’s an example of how to send an email message with the sendmail tag:
<dtml-sendmail>
To: <dtml-var recipient>
From: <dtml-var sender>
Subject: Make Money Fast!!!!

Take advantage of our exciting offer now! Using our exclusive method
you can build unimaginable wealth very quickly. Act now!
</dtml-sendmail>
Notice that there is an extra blank line separating the mail headers from the body of the message.
A common use of the sendmail tag is to send an email message generated by a feedback form. The sendmail tag can contain any DTML tags you wish, so it’s easy to tailor your message with form data.
17.14. The Mime Tag
The mime tag allows you to format data using MIME (Multipurpose Internet Mail Extensions). MIME is an Internet standard for encoding data in email message. Using the mime tag you can use Zope to send emails with attachments.
Suppose you’d like to upload your resume to Zope and then have Zope email this file to a list of potential employers.
Here’s the upload form:
<dtml-var standard_html_header>

<p>Send you resume to potential employers</p>

<form method=post action="sendresume" ENCTYPE="multipart/form-data">
<p>Resume file: <input type="file" name="resume_file"></p>
<p>Send to:</p>
<p>
<input type="checkbox" name="send_to:list" value="jobs@yahoo.com">
  Yahoo<br>

<input type="checkbox" name="send_to:list" value="jobs@microsoft.com">
  Microsoft<br>

<input type="checkbox" name="send_to:list" value="jobs@mcdonalds.com">
  McDonalds</p>

<input type=submit value="Send Resume">
</form>

<dtml-var standard_html_footer>
Note: The text :list added to the name of the input fields directs Zope to treat the received information as a list type. For example if the first two checkboxes were selected in the above upload form, the REQUEST variable send_to would have the value [jobs@yahoo.com, jobs@microsoft.com]
Create another DTML Method called sendresume to process the form and send the resume file:
<dtml-var standard_html_header>

<dtml-if send_to>

  <dtml-in send_to>

    <dtml-sendmail smtphost="my.mailserver.com">
    To: <dtml-var sequence-item>
    Subject: Resume
    <dtml-mime type=text/plain encode=7bit>

    Hi, please take a look at my resume.

    <dtml-boundary type=application/octet-stream disposition=attachment
    encode=base64><dtml-var expr="resume_file.read()"></dtml-mime>
    </dtml-sendmail>

  </dtml-in>

  <p>Your resume was sent.</p>

<dtml-else>

  <p>You didn't select any recipients.</p>

</dtml-if>

<dtml-var standard_html_footer>
This method iterates over the sendto variable and sends one email for each item.
Notice that there is no blank line between the ‘To:’ header and the starting mime tag. If a blank line is inserted between them then the message will not be interpreted as a multipart message by the receiving mail reader.
Also notice that there is no newline between the boundary tag and the var tag, or the end of the var tag and the closing mime tag. This is important, if you break the tags up with newlines then they will be encoded and included in the MIME part, which is probably not what you’re after.
As per the MIME spec, mime tags may be nested within mime tags arbitrarily.
17.15. The Unless Tag
The unless tag executes a block of code unless the given condition is true. The unless tag is the opposite of the if tag. The DTML code:
<dtml-if expr="not butter">
  I can't believe it's not butter.
</dtml-if>
is equivalent to:
<dtml-unless expr="butter">
  I can't believe it's not butter.
</dtml-unless>
What is the purpose of the unless tag? It is simply a convenience tag. The unless tag is more limited than the if tag, since it cannot contain an else or elif tag.
Like the if tag, calling the unless tag by name does existence checking, so:
<dtml-unless the_easter_bunny>
  The Easter Bunny does not exist or is not true.
</dtml-unless>
Checks for the existence of the_easter_bunny as well as its truth. While this example only checks for the truth of the_easter_bunny:
<dtml-unless expr="the_easter_bunny">
  The Easter Bunny is not true.
</dtml-unless>
This example will raise an exception if the_easter_bunny does not exist.
Anything that can be done by the unless tag can be done by the if tag. Thus, its use is totally optional and a matter of style.
17.16. Batch Processing With The In Tag
Often you want to present a large list of information but only show it to the user one screen at a time. For example, if a user queried your database and got 120 results, you will probably only want to show them to the user a small batch, say 10 or 20 results per page. Breaking up large lists into parts is called batching. Batching has a number of benefits.
o The user only needs to download a reasonably sized document rather than a potentially huge document. This makes pages load faster since they are smaller.
o Because smaller batches of results are being used, often less memory is consumed by Zope.
o Next and Previous navigation interfaces makes scanning large batches relatively easy.
The in tag provides several variables to facilitate batch processing. Let’s look at a complete example that shows how to display 100 items in batches of 10 at a time:
<dtml-var standard_html_header>

  <dtml-in expr="_.range(100)" size=10 start=query_start>

    <dtml-if sequence-start>

      <dtml-if previous-sequence>
        <a href="<dtml-var URL><dtml-var sequence-query
           >query_start=<dtml-var previous-sequence-start-number>">
           (Previous <dtml-var previous-sequence-size> results)
        </a>
      </dtml-if>

      <h1>These words are displayed at the top of a batch:</h1>
      <ul>

    </dtml-if>

      <li>Iteration number: <dtml-var sequence-item></li>

    <dtml-if sequence-end>

      </ul>
      <h4>These words are displayed at the bottom of a batch.</h4>

      <dtml-if next-sequence>
         <a href="<dtml-var URL><dtml-var sequence-query
            >query_start=<dtml-var
            next-sequence-start-number>">
         (Next <dtml-var next-sequence-size> results)
         </a>

      </dtml-if>

    </dtml-if>

  </dtml-in>

<dtml-var standard_html_footer>
Let’s take a look at the DTML to get an idea of what’s going on. First we have an in tag that iterates over 100 numbers that are generated by the range utility function. The size attribute tells the in tag to display only 10 items at a time. The start attribute tells the in tag which item number to display first.
Inside the in tag there are two main if tags. The first one tests special variable ‘sequence-start’. This variable is only true on the first pass through the in block. So the contents of this if tag will only be executed once at the beginning of the loop. The second if tag tests for the special variable ‘sequence-end’. This variable is only true on the last pass through the in tag. So the second if block will only be executed once at the end. The paragraph between the if tags is executed each time through the loop.
Inside each if tag there is another if tag that check for the special variables ‘previous-sequence’ and ‘next-sequence’. The variables are true when the current batch has previous or further batches respectively. In other words ‘previous-sequence’ is true for all batches except the first, and ‘next-sequence’ is true for all batches except the last. So the DTML tests to see if there are additional batches available, and if so it draws navigation links.
The batch navigation consists of links back to the document with a query_start variable set which indicates where the in tag should start when displaying the batch. To better get a feel for how this works, click the previous and next links a few times and watch how the URLs for the navigation links change.
Finally some statistics about the previous and next batches are displayed using the ‘next-sequence-size’ and ‘previous-sequence-size’ special variables. All of this ends up generating the following HTML code:
<html>
<head><title>Zope</title>
</head>
<body bgcolor="#FFFFFF">

  <h1>These words are displayed at the top of a batch:</h1>
  <ul>
    <li>Iteration number: 0</li>
    <li>Iteration number: 1</li>
    <li>Iteration number: 2</li>
    <li>Iteration number: 3</li>
    <li>Iteration number: 4</li>
    <li>Iteration number: 5</li>
    <li>Iteration number: 6</li>
    <li>Iteration number: 7</li>
    <li>Iteration number: 8</li>
    <li>Iteration number: 9</li>
  </ul>
  <h4>These words are displayed at the bottom of a batch.</h4>

     <a href="http://pdx:8090/batch?query_start=11">
       (Next 10 results)
     </a>

</body>
</html>
Another example utilizes the commonly accepted navigation scheme of presenting the the user page numbers from which to select:
<dtml-in "_.range(1,101) "size=10 start=start>
<dtml-if sequence-start>
<p>Pages:
<dtml-call "REQUEST.set('actual_page',1)">
<dtml-in previous-batches mapping>
<a href="<dtml-var URL><dtml-var sequence-query>query_start=<dtml-var "_['batch-start-index']+1">">
<dtml-var sequence-number></a>
<dtml-call "REQUEST.set('actual_page',_['sequence-number']+1)">
</dtml-in>
<b><dtml-var "_['actual_page']"></b>
</dtml-if>
<dtml-if sequence-end>
<dtml-in next-batches mapping>
<a href="<dtml-var URL><dtml-var sequence-query>query_start=<dtml-var "_['batch-start-index']+1">">
<dtml-var "_['sequence-number']+_['actual_page']"></a>
</dtml-in>
</dtml-if>
</dtml-in>
<dtml-in "_.range(1,101) "size=10 start=start>
<br><dtml-var sequence-item>
</dtml-in>
This quick and easy method to display pages is a nice navigational tool for larger batches. It does present the drawback of having to utilize an additional dtml-in tag to iterate through the actual items, however.
Batch processing can be complex. A good way to work with batches is to use the Searchable Interface object to create a batching search report for you. You can then modify the DTML to fit your needs. This is explained more in the chapter entitled Searching and Categorizing Content.
17.17. Other useful examples
In this section are several useful examples of dtml code. While many of these are most often better done in Python scripts, there are occasions when knowing how to accomplish this in dtml is worthwhile.
17.17.1. Forwarding a REQUEST
We have seen how to redirect the user’s browser to another page with the help of the call directive. However, there are times when a redirection is not necessary and a simple forwarding of a REQUEST from one dtml-method to another would suffice. In this example, the dtml-method shown obtains a variable named type from the REQUEST object. A lookup table is reference to obtain the name of the dtml-method to which the REQUEST should be forwarded. The code below accomplishes this:
<dtml-let lookup="{'a' : 'form15', 'b' : 'form75', 'c' : 'form88'}">
      <dtml-return "_[lookup[REQUEST.get('type')]]">
</dtml-let>
This code looks up the name of the desired dtml-method in the lookup table (contained in the let statement) and in turn, looks up the name of this dtml-method in the current namespace. As long as the dtml-method exists, control will be passed to the method directly. This example could be made more complete with the addition of exception handling which was discussed above.
17.17.2. Sorting with the ‘<dtml-in>’ tag
There are many times when sorting a result set is necessary. The dtml-in tag has some very interesting sort capabilities for both static and dynamic sorting. In the example below, a ZSQL method is called that returns results from a log table. The columns returned are logTime, logType, and userName. The dtml-method or document that contains this code will generate links back to itself to re-sort the query based upon certain search criteria:
<dtml-comment>
The sorting is accomplished by looking up a sort type
variable in the REQUEST that is comprised of two parts. All
but the last character indicate the name of the column on
which to sort. The last character of the sort type indicates
whether the sort should be ascending or descending.
</dtml-comment>
<table>
<tr>
<td>Time <a href="<dtml-var URL>?st=logTimea">A</a> <a href="<dtml-var URL>?st=logTimed">D</a></td>
<td>Type <a href="<dtml-var URL>?st=logTypea">A</a> <a href="<dtml-var URL>?st=logTyped">D</a></td>
<td>User <a href="<dtml-var URL>?st=userNamea">A</a> <a href="<dtml-var URL>?st=userNamed">D</a></td>
</tr>
<dtml-comment>The line below sets the default sort</dtml-comment>
<dtml-if "REQUEST.get('st')==None"><dtml-call "REQUEST.set('st', 'logTimed')"></dtml-if>
<dtml-in getLogData sort_expr="REQUEST.get('st')[0:-1]" reverse_expr="REQUEST.get('st')[-1]=='d'">
<tr>
<td><dtml-var logTime></td>
<td><dtml-var logType></td>
<td><dtml-var userName></td>
</tr>
</dtml-in>
</table>
17.17.3. Calling a DTML object from a Python Script
Although calling a DTML method from a Python script isn’t really an advanced DTML technique, it deals with DTML, so it’s being included here. To call a DTML Method or DTML Document from a Python script, the following code is used:
dtmlMethodName = 'index_html'
return context[dtmlMethodName](container, container.REQUEST)
It’s as simple as that. Often this is very useful if you wish to forward a request and significant processing is needed to determine which dtml object is the target.
17.17.4. Explicit Lookups
Occasionally it is useful to “turn off” acquisition when looking up an attribute. In this example, you have a folder which contains sub-folders. Each sub-folder contains Images. The top-level folder, each subfolder, and each image contain a property named desc.
If you were to query the Image for its desc property it would return the desc property of it’s parent folder if the Image did not have the property. This could cause confusion as the Image would appear to have the desc property when it really belonged to the parent folder. In most cases, this behavior is desired. However, in this case, the user would like to see which images have the desc property and which don’t. This is accomplished by utilizing aq_explicit in the call to the object in question.
Given the following structure:
Folder
  |
  |- Folder1 (desc='Folder one')
  |- Folder2 (desc='Folder two')
       |- Image1 (desc='Photo one')
       |- Image2
       |- Image3 (desc='Photo three')
when the second image is asked for its desc property it will return ‘Folder two’ based on acquisition rules:
<dtml-var "Image2.desc">
However, utilizing aq_explicit will cause Zope to look only in the desired location for the property:
<dtml-var "Image2.aq_explicit.desc">
This will, of course, raise an exception when the desc property does not exist. A safer way to do this is:
<dtml-if "_.hasattr(Image2.aq_explicit, 'desc')">
  <dtml-var "Image2.aq_explicit.desc">
<dtml-else>
  No desc property.
</dtml-if>
As you can see, this can be very useful.
17.18. Conclusion
DTML provides some very powerful functionality for designing web applications. In this chapter, we looked at the more advanced DTML tags and some of their options. A more complete reference can be found in Appendix A.
The next chapter teaches you how to become a Page Template wizard. While DTML is a powerful tool, Page Templates provide a more elegant solution to HTML generation.